Wednesday, September 11, 2013

Some Summer Bee Blocks

Cross or Plus block made with black and white fabrics for the cross.  We were told we could make the cross part any size and any location within the block.

These blocks are called a digital pinwheel block and were inspired by one of the quilts in Amy Ellis' book Modern Neutrals.

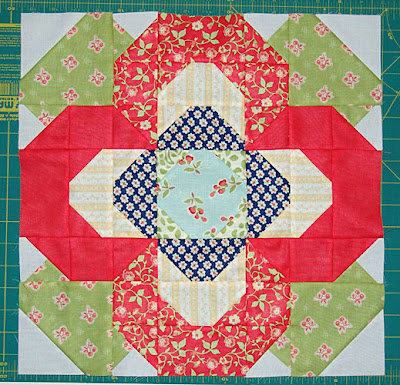
This flower block was from a tutorial from the bee member's blog.  You have to pay attention to what you're doing, but the end result is lovely!

I'm sure you've seen these Japanese + and X blocks popping up all over the internet.  This one is the 7.5 inch one made using the Badskirt Amy tutorial.

A pinwheel block made using the Sew Mama Sew tutorial.

This block was called Ring-Toss and I used the tutorial on Woodland Cottage Designs.

Some Summer Bee BlocksSocialTwist Tell-a-Friend

Monday, August 19, 2013

Please accept my apology...

To those who were following along for the sew along, I completely apologize for the lack of a follow up post!  I had written a skirt tutorial for you that just needed photos....and then life got majorly in the way.  So, I will be catching up on posts for the Sew Along shortly, as well as, showing some bee blocks, tutorials, etc.  Please have patience.

In the between time, know that it is really good to have hot water, working kitchen faucets, toilets that flush, medicine for sick canines, and most importantly, family and friends that help when life gets crazy!  So, count your blessings.
Please accept my apology...SocialTwist Tell-a-Friend

Wednesday, July 17, 2013

Etsy Shop Prep

Sorry to those following along for the long pause in blogging.  I have been unemployed for a few months now looking for a job--no, still haven't found one--but, I do have a plan.  I decided to give my Etsy shop another go! 

I actually had opened one quite awhile ago and had a few things listed, but my job and life took up too much of my attention to really get things going properly.  Now that some of that is out of the way, I've been working on getting things set up.  I also talked my mom and sister into trying a few of their items too, so there'll be a bit more variety.

So, what's taking so long?  Well, mainly the CPSIA details.  The federal government has added a few new huge regulations for those making children's toys and products which complicate the berjeebers out of it all.  (I know, I've been watching videos and reading documents until my eyes want to bleed from all the legal talk!)  It also can make things very expensive unless you very carefully choose your toy components because everything has to meet the new lead and phthalate level requirements, as well as, the safety standards.  That means expensive third party testing.

There are many things like fabric, thread, Velcro, wood, pearls, etc. that are exempted from testing because they've already proven that there's no lead (and not being plastic, obviously no phthalates) in them.  BIG sigh of relief there!  But things like plastic safety eyes, buttons, rhinestones, zippers, snaps, etc. all still need testing.  Fortunately, for small batch makers like myself, we can use the General Conformity Certificate (GCC) of the component's company.  Unfortunately, many manufacturers are simply avoiding testing by saying that their products aren't made specifically for 12 years or younger and so they won't test according to CPSIA requirements.  This makes it a bit frustrating when you want to use something like say a plastic button or maybe a cool vintage glass button on a doll or something as simple as a sew-on snap.  I think the least expensive lab I saw was charging around $45 for one particular lead level test.  Add to that lead in surface coatings (such as paint on a wooden block) or phthalate totals (such as certain plastic parts) and you can see how costs start to rise.  And, this is for each item.  So, if you start seeing these items missing from handmade toys, don't be surprised.  (Although, I know there are many handcrafters who are just ignoring it all.)

My solution is to separate my handcrafted creations into categories for children (3 to 12 years old) and the "adults" (older than 12 years).  I will continue to make my heirloom and art dolls and creatures for those who are old enough to not put their buttons in their mouths, but I will also make "child safe" versions without untested items.  So, for example, a doll dress might have Velcro or wooden or mother-of-pearl buttons for closures for the child's version while the heirloom version might have sew-on snaps and resin buttons instead.  Animal type creatures will have felt or embroidered eyes instead of my usual button eyes (although I do embroider many of the heirloom/art faces too).  So, for now, there will simply be some items not available in a child's version.  As I get testing documentation in place, I can add these components to my child versions.

Don't worry, I have some lovely dolls and toys in the works for children---they'll never miss the rhinestones!  For now though, I've revamped my shop look, designed labels and cards, drawn up new patterns and gathered my old ones, picked out fabrics and begun cutting away.  Now, I'm just waiting for my CPSIA regulated woven labels and contact cards to arrive.

So, if you buy handmade toys (and I certainly hope you do), support those crafters who have gone to all the effort to meet the requirements of CPSIA---it really is a huge effort.

I hope you'll come visit my shop once I get some of my creations in there for you to see!

And now, I have a skirt to finally make...
Etsy Shop PrepSocialTwist Tell-a-Friend

Monday, June 3, 2013

RATZ and Super Swaps

Just a quick post to share some swap items I sent out. 

The first is a coffee cozy (which, incidentally, also fit around the individual sized Ben & Jerry's ice cream containers...just sayin') made for my secret partner in RATZ (Rapid and Tiny Zakka) swap.  She had lots of likes to work off of, which somehow makes it harder, including red and white combos.  She also seems to have a liking for the French General style fabrics. (Warning:  lousy inside-at-night photos to follow.)

I really liked the button (a tulip) on this.  Also the added bit of satin ribbon.

Just love the feminine feel of this softly colored fabric!

While I was making coffee cozies, I also made one for my Super Swap partner.  (I used the pattern and tutorial found at InColorOrder by Jeni Baker for guidance.)  For my partner, I had Michelle (a.quilter.2) who is quite talented and based on her favorites reminded me of my younger sister--lots of fun, whimsical, modern likes.  She also likes giraffes, but more on that in a second.  So I made her a bright kind of silly cozy with a cute little worm in the center (you know...early bird gets the worm...okay, maybe its only hilarious when you're up really late).  The center is made in log cabin block style only using folded strips of fabric (think iris folding only not as complicated).


Isn't that a cute little worm?  The button is actually two buttons stacked.

I had some gray houndstooth, which coordinated with the gray on the front, plus houndstooth is just fun.

Now to the actual swap item for Super Swaps---this round was pincushion or small animal.  And, as sort of mentioned earlier, I made a giraffe for Michelle.  When I saw that she liked animals, particularly owls and giraffes, I knew I had to make her a little creature.  However, when I decided on a giraffe and went looking for a pattern, there were almost none out there!  The few that did exist were more floppy or child styled or were out of print.  Mmph!  I did find another cute one, but the etsy seller was on vacation.  Left high and dry, I was.  So, I made a pattern myself (go me!) and created my very own giraffe!

Hello there!

I used felt for the ears, regular quilting cotton for the body and for the antlers I made two tiny French knots out of wool embroidery yarn.  I used variegated DMC perle cotton floss and wool embroidery yarn for the mane and tail. 

Isn't this little guy a cutie?  I did the mane in loops, but it would look cute as fringe too.

Michelle likes Tula Pink which is what I used for the body---which worked out perfectly as I had all the color coordinating flosses, yarns and felt.  It was meant to be.  :)

Figuring out the gusset (underneath belly part) was the hardest,  (I think I might tweak it just a touch more) but after three test ones, I got it to where I liked the results.  This giraffe is just the right size to be either a fun little shelf sitter or a pin cushion, so Michelle can use it either way.

You can see the tail here--it is braided and matches the mane.

I need to write up some instructions, but then I'm going to have the pattern available for others to enjoy.  I think I may make a larger size too that would be more child toy size.  We'll see how the pattern translates to the larger scale.  Anyone interested?  First though, I need to make me a giraffe--this one was hard to give away!

Could you stick a pin in him?
RATZ and Super SwapsSocialTwist Tell-a-Friend

Sunday, May 19, 2013

Blogger Problems--Stay Tuned for Part 3 of Challenge 1 in the GBSB Sew Along

Blogger keeps trying to log me out as I type, so rather than log back in for the 20th time (literally), I'm going to just say have a great day and we'll pick back up later on our sew along progress.  (You could always prewash and iron your fabric while you wait.)

I've also got a little trouser tutorial coming and some crafty goodness, so hopefully Blogger will behave itself tomorrow!
Blogger Problems--Stay Tuned for Part 3 of Challenge 1 in the GBSB Sew AlongSocialTwist Tell-a-Friend

Wednesday, May 15, 2013

Lulu the Elephant and a String Block

Just a little peek at some of the things I've been working on...

For April, Deanna (aka Spongebobette), a member of Bee White Black, requested a string block.  She asked us to use the solid gray for the center string and then towards the centers use the red solid.  The red was to be lined up as closely as possible.  This was harder than it would seem as the strips of fabric are different widths, so you have to plan carefully to get near the same point for sewing on the red!  Each square of is 6.5 inches, making a 12.5 inch block when sewn together.

I like the bold red in the center!


I also completed this little elephant softie for my younger sister's birthday.  (I don't know what she'll name it, but we'll just call her Lulu for now.)  Lulu is made from an upcycled dress that was one of my sister's favorites.  In fact, I did a makeover on the dress once changing it from a V-neck swing dress to a cross-over faux wrap A-line dress with white piping down the overlap while also widening it at the waist.  I think she wanted to try and remake it again when that didn't fit, but I wasn't game so the dress went into the thrift shop pile.  Later, I got to thinking about it and snuck it out of the pile for repurposing into the elephant.  I've been hiding this for almost a year now!

Lulu goes well with the miniature quilt on my wall, hmm... just kidding!

Lulu is made from Simplicity 2613 like Marvin.  She's sporting a lovely 1 inch wide white satin ribbon.  Don't you love the flower around her eye?  Yeah, that's the power of fussy cutting!

Lulu the Elephant and a String BlockSocialTwist Tell-a-Friend

Sunday, May 12, 2013

The GBSB Sew Along Challenge 1 A-line Skirt, Part 2 Fitting

Wait!  What?  You're not shaped like a fit model with an exact ten inch difference between waist and hip?  Me neither.

The whole reason for a sew along is to make something usable, so unless you are built like the fit model used by the pattern company...deep breath...you're going to have to adjust the pattern to fit your real life body (or whomever you're making the skirt for).  Now, before you start weeping and wailing over the thought of trying to fiddle with a pattern that was obviously made for some industry ideal shape (which, by the way, is so not realistic for most women), let me assure you that a skirt is one of the easiest things to fit----really!

So, big deep breath...and exhale.  Better?  Good.  Let's get started.  I'm going to show you the basics of how I fit a skirt.  But, if you need more help, better instructions, or just want a more indepth fitting reference, I can recommend the books Fit for Real People by Pati Palmer and Marta Alto, Pattern Fitting with Confidence (used to be Fitting Finesse, I think) by Nancy Zieman, and The Complete Photo Guide to Perfect Fitting by Sarah Veblen.  I've had classes from Marta and Sarah and both are very knowledgeable on this which totally shows in the books.  I've also enrolled in Craftsy's Sew the Perfect Fit class with Lynda Maynard, which so far is quite good.  There are also fitting classes on Pattern Review from time to time, although no skirt ones at the moment.

Choosing a Size

I think this part stumps many people, especially those just starting into sewing clothes.  Pattern sizes do not coorelate to ready-to-wear sizes.  For skirts, I fit into size 6 at most stores (we all know how varied sizing can be between brands), but in patterns I usually range around a 14 depending on the company and cut of the design.  Huge difference!  So first thing to do, toss out of your head any preconceived ideas of what "size" you should be.  You are the size you are, the only reason we care at all is to know how to cut our fabric. 

This pattern gives two sets of measurements--one for your measurements (to choose a size from) and one for the finished measurements of the garment (so you'll know how loose the clothing fits).

To choose a size for skirts, ignore all that fluff about bust measurements, not needed here, go straight to the waist and hip measurements.  Remembering that this is just a starting point, find the ones that are closest to yours (they may be different sizes!) and mark that.  When I'm working with a simple skirt, I usually will opt for the hip measurement even though my waist would indicate a larger size (if your waist is bigger than your hips, you'll want to go with the size which matches closest to your waist measurement) otherwise, I'd find myself swimming in fabric around the hips making an A-line skirt more like a full skirt!  I'm no curvy girl, there's not a huge difference between waist and hip (and there's less now than used to be, lol), so I find it easier to simply adjust the waist area rather than fiddle with the shape and drape of the entire skirt. 

Maybe you fall in between "size" measurements or your waist is bigger than the "size" for your hips.  This is not unusual.

If you want to be able to keep your original intact, then I recommend tracing the pattern pieces first.  I like to use the Tru-Grid by Pellon as it is sewable, drapes more like tissue and fabric, and can be seen through for easy transfer of marks.  (Other great options include Swedish tracing paper, medical exam table paper, tracing paper...)  Once I get the originals traced off in my chosen size, and add seam allowances if needed (hello, Burda--yes, I like to pre-add the seam allowances, because I tend to forget that Burda doesn't have them already in and that makes for some very unhappy discoveries of having cut the sewing line instead), I cut generously around my tracings at the side seams (usually I leave a couple of inches extra).  Then pin along the sewing line.  (If you're using a pattern with seam allowances included, you'll want to mark this out with a pen so you have a reference line to follow.  I like to use a different color just to distinguish it from my cutting line.)  Also, pin any darts or pleats.

Now, carefully try this on over your undergarments (including slip and tights/pantyhose if you wear them normally).  You'll want to have a clip or two to hold the zipper area together so that your hands are free.  Standing in front of a mirror will help you to see any areas that aren't fitting.  Simply unpin those places and repin so that the fit is better.  Around the waist, make sure you unpin and repin in equal amounts for each side.  If the front darts are poofing funny, try taking them out or making them smaller in depth (leave the length as is).  Maybe your back darts need to be deeper (I don't have much of a booty so this is never my problem)  Also, take a look at the side seam and hem--are they straight?  If not adjust by pulling up the front or back a bit.  (By wearing a "belt" of elastic at your waist over the pattern, you'll have a reference for marking a new "waist" when done adjusting.  Mark with a pen prior to taking off the pattern.)  You may need to add width to only the front (or back) rather than both.


Here's a view of some basic adjustments (from Painless Sewing) that you can make.


At this point, I carefully take off the pattern and make a pen mark over each pin that was adjusted.  Now, make these changes to your traced off pattern.  You may need to smooth out the transition from waist to hip or the curve of the waist.  If you made your waist area larger or changed the curve of the waist, don't forget to also adjust the facing to match.

Here's a quick view of the pivot slide method for adjusting skirt width (also from Painless Sewing).


Your adjusted pattern may look a bit Frankensteined with it's additions and adjustments, but that's okay.  The point is to have a pattern that fits you perfectly which you can then use again and again.

You can see that I've added to the width at the side seam once since the original tracing and adjustment and made that same addition to the facing.  Once you've got a pattern that fits you, little adjustments for weight gain or loss are easy to make.

Once you've made your adjustments, you are ready to make your skirt.  If you still aren't sure of your adjustments, you could always make a muslin to test the pattern with real fabric.  This could be necessary if you were using something stiffer to trace your pattern on.  A muslin is also handy if your weight changes (or you're planning to change it) as you can test adjustments to that before making permanent changes to your already fitting pattern.  (I have Crohn's Disease, so regular weight change is a part of life.  Sometimes I only take in or let out a side seam a smidgen, but sometimes I need to make bigger adjustments.  And while I plan on getting into a more toned shape {aka flatten that tummy somewhat} after finally gaining some much needed weight...there's nothing wrong with having a few new skirts in the mean time.)


After some weight gain, I adjusted the pattern and tested those adjustments on my old muslin.  You can see that I still chose to leave the front darts off, but needed a bit more room at the waist for my front piece.  Much easier than doing sit ups!


While fitting the pattern adds an extra step to the process, it is well worth it to have a skirt that is fit at the waist and hips properly and already has the length you want.  Once this is done, you can focus your attention on the fun parts like choosing fabrics, embellishments and style changes!


The GBSB Sew Along Challenge 1 A-line Skirt, Part 2 FittingSocialTwist Tell-a-Friend

Sunday, May 5, 2013

The GBSB Sew Along--Challenge 1 A-Line Skirt Part 1


The Great British Sewing Bee Sew Along begins...

Watched episode 1 yet?  If you have, then you know that the first challenge involves sewing an A-line skirt from a pattern.  Contestants were to show that they could properly carrying out basic techniques such as following pattern instructions, inserting zippers, sewing darts, etc. while completing a basic skirt.  They could also embellish and personalize it as long as they did not change the basic shape of the A-line.  For the experienced sewers, it was really about perfecting technique and showing the ability to work with linings, tricky fabrics, etc. and for the less experienced, getting the zipper in correctly seemed to be the biggest challenge. 

Skirts with an A-line shape fit at the waist, skim over the hip area and continue to widen just a bit, and fall slightly out from the body----like the legs of a capital letter "A".  This is different from a straight skirt which fits at the waist, skims over the him and then continues at that same width to the hem---like the sides of a capital "H".  Pencil skirts taper in after the hip area---like a "V" and, of course, there are flared or full skirts that have more volume to them than a classic A-line, often created with gathers, godets, panels or pleating.  Let's face it, there is an infinite variety to skirts!

For this challenge, we'll be sticking with the A-line style skirt with darts and zipper.  Do you have to have a commercial pattern?  Nope.  You are certainly welcome to draft you're own.  Books such as Sew What! Skirts and classes such as Craftsy's Design and Sew an A-line Skirt (which happens to be on sale at the moment) can teach you to draft a custom pattern. 

Commercial patterns for A-line skirts abound and you can choose one of the ones listed below or find a different one.

Burda 04-2013-122
Burda 03-2013-109
Burda 11-2012-124
Burda 10-2012-121A
Burda 09-2012-116B  (I'll be making this one for a second skirt.)
McCall's 3341
Butterick 4461  (I'll be using this one for my first skirt demo.)
Colette Ginger
Simplicity 1717
New Look 6106

As you can see, there's quite a few out there, and those are just the ones I listed.  There are also vintage patterns and independent designers available.  Just make sure that, for the purposes of this sew along, it has a zipper (can be on the side or back) and darts.  There are lots of really cool a-lines out there with buttons, wraps, even elastic and there are lots of other skirt styles, but save those for another time.

Just like in The Great British Sewing Bee, you can choose your length, embellishments, fabric, lining, etc. and for this sew along, you can choose to fit the skirt to whomever you want.  That's right---it should fit the person who'll wear it!  Unlike the show, which simply used the manufacturer's sizing for a mannequin, we want to actually be able to use what we make.  Because of the need to fit the skirt to a real person (and still hold down our day jobs), we'll be taking more than the 3.5 hours allotted to the contestants.

Don't panic though---fitting a skirt is really easy!  You only need three measurements to get started:  waist (in this case not your natural waist, but where you actually wear your skirt), hip (widest spot below the waist, this may include more thigh) and length.  It is totally okay to have a friend help!  So, go pick your pattern, fabric and plan some embellishments.  Don't forget your zipper, interfacing, thread, etc..  I'm trying to use what's in my stash, so I probably won't need to shop for anything for this challenge.  (I was going to add the need to have supplies and pattern in a week, but I know many of us need to order online to get anything decent or plan trips into bigger cities, so just begin the time frame when you have your needed supplies.)

Remember, that while this is to challenge ourselves, its also about having some fun with sewing!  So go ahead and pick that crazy novelty or seasonal fabric, get out the trims, and make it fun...after all, we're making a skirt, not performing brain surgery!

Imagine hearing this next part in a British accent...

You'll have two weeks total (from the time you have pattern and supplies) to complete the challenge including fitting your model.  Your time starts...now.


The GBSB Sew Along--Challenge 1 A-Line Skirt Part 1SocialTwist Tell-a-Friend

Saturday, May 4, 2013

The Great British Sewing Bee--And a Sew Along!

Recently, some of us in the United States have been introduced to a BBC show called The Great British Sewing Bee.  I love the focus on sewing from an amateur contestant viewpoint.  (Also, the lack of snarky behavior from both participants and judges is refreshing after Project Runway.)  The show only has eight contestants and four episodes, so not a huge time commitment, but lots of fun to watch.  (And, let's be honest...using a fun British accent makes everything more interesting.)

Fortunately, some very thoughtful individuals have put the episodes on YouTube for the rest of us to watch.  (Warning:  The last two episodes have those annoying commercials in them.  Hopefully ones without them will be uploaded soon.)

Episode 1
Episode 2
Episode 3
Episode 4

After watching, I got to thinking.  I've always wanted to try a sew along to Project Runway, but so often their challenges don't really fit into a practical everyday sewist's life.  I mean, really, do I want a dress from the hardware store or men's stripper pants.  Nope.  No way.  But...with this show, the challenges are practical, doable, and can be done within budget.  And I can stand watching the episodes again to get details and inspiration. 

Thus, I've decided to have my very own The Great British Sewing Bee Sew Along, or The GBSB Sew Along.  I'll be taking each challenge in order but adding more time to allow for things like actually fitting the patterns to myself or a victim volunteer model (aka sisters, cousins, etc.), finding the needed clothing for alteration challenges and real life jobs.  I'm also going to try and only use from my stash, but I may need to get notions, linings, or a particular challenge fabric.  It'll definitely push me outside of my comfort zone (fly front trousers, gulp).  You can start any time, so if you're reading this a month from now, don't be shy about joining in the fun! 

Anyone want to join me?


If you do, be sure and join our Flickr group to show off your project photos, and don't forget to grab the button over there on the sidebar.


The Great British Sewing Bee--And a Sew Along!SocialTwist Tell-a-Friend

Sunday, April 21, 2013

Some Projects

Well, February, March, and now April, seem to have flown by!  I've been working on projects left and right trying to catch up on my projects.  Between various interruptions, including when my grandmother (she's almost 85) fell and broke and dislocated her hip (Needless to say lots of back and forth for family in travel and phone calls.), I feel like I got a lot of things half done and very little finished.  Hopefully, I'm not the only one who does this.

I did finish some bee blocks.  A couple of Bee White Black months--string blocks and a pinwheel.  Both are nice and easy to make, so even if you're new to quilting, give them a try.  For the string blocks, we followed the Film in the Fridge tutorial and for the pinwheel, we used this pdf tutorial from Sew Mama Sew.

Do you see the little gecko?

This is not a color I would choose, and yet I like the result with the black and white fabric.

Then there's the quilt I'm trying to get done for my grandma's 85th birthday.  I don't think I'll get it done on time, as there have been plenty of interruptions, but I won't be going up on her exact birthday, so I've still got some time. 

I used a cream background (Kona Snow, I think) and plum, peach and blue solids with butterfly prints.  Each butterfly print is different, making a total of 80 different prints plus one more which will be used for the border.  (Yes, I've been saving up butterfly print charms for quite some time for a special quilt.)  I picked butterflies because the quilt she made for my parents when they got married was an appliqued butterfly quilt.  The pattern is called the Disappearing 9-patch, which has been around for awhile.  If you've never made one before, here's a good tutorial.  (There are many out there, including some YouTube videos.)

I ran out of peach ones at the end there, but that's okay.

I thought for awhile about doing a modern quilt, but my grandma tends to like the more traditional styles, so I thought this was a good pattern for something inbetween.  I've still got to finish sewing this middle part together and add the border.  Here's the other half of it, I was fast running out of room!


Please parden the pile of toys there in the corner.  Stars likes to be whereever I am, so the toys keep him off the quilts!

The other quilting project that I acquired is to make four quilts that my grandmother had started years and years ago (like in the 70's and 80's).  She had originally planned to make one for each grandkid as they got married.  (There's 32 of us...I think, I'd need to sit and count.)  And so far she has, well, for everyone except me.  She also hadn't done the ones for my siblings as they haven't been married, but she made it clear that they probably wouldn't get done.  (It's a long story that comes down to her holding a grudge against my dad for becoming a school teacher instead of going into real estate like his dad.)  Well, I've tried for years, as has our family and one of my aunts, to convince her to, if she wasn't going to make them, at least give us what she had done so that I could finish them.  That way at least we would get them.  For years it was a no go, then, after her hip surgery, she decided to hand them over.  So, when my dad and sis went up to check on her, they brought back a bunch of boxes with quilts. 

Or rather quilt parts.  Mostly there are cut pieces with a little here and there sewn. 

And boy are those pieces bright!  Opening this box was like time traveling to the 70s.

It's a big job---4 queen size quilts in pieces.  All hand cut (not nearly as accurate as rotary cutter) and very minimal, if any, instruction.  I started a little of the one for my oldest sister and went through each and wrote down what is there and what is still needed.  I've decided that once I finish the birthday quilt, these will be my regular Sunday afternoon project.

This one had all the print/solid pairs cut and half the white, along with two finished blocks and one with the diamonds already sewn.  I remember her saying she had difficulty with getting the points right.  The white pieces are curved but the print/solid parts aren't, so it should be interesting putting the two together.

This is the quilt that was for my oldest sister.  Grandma called it Worlds Without End.  I need to cut some more white, but fortunately I have some of the white she used originally to finish with.

The fabric also is not all regular cotton.  Some polyester, some lighter weight, some heavier--the solids are almost all a lighter weight than today's quilting fabrics.  But at the time, there really wasn't nearly the range and availability of quilting cottons.  A truly scrappy quilt.  I figure though that early pioneers worked with whatever fabric they had on hand, so this will be an adventure.

Very cheerful fabric, isn't it?
My grandmother never had quilting classes or quilting books and television shows growing up.  She learned to quilt from her mother or, if not available, just figured it out herself.  My grandmother has made way over 40 queen sized quilts, countless twin and lap sized, not to mention all the baby blankets, pieced fleece "quilts" (literally at least 100 of these, many of which were donated to charity) and denim tied quilts throughout her life.  She used to handquilt her quilts until she got older.  The quilt that used to be on my parents bed when we were growing up was made by her.  So we all grew up with her quilting.

You might be wondering why I'd take on such a project and make her a birthday quilt.  I mean afterall, she wouldn't even bother to finish making me one for my wedding (one that was all cut out and basted down ready to applique).  She's often been quite unloving to our family, especially my dad.  She didn't care at all if my siblings and I never received those quilts.  So why bother?  Well, despite her plain onery self, she is my grandma and I still love her.  I think one day down the road it will mean something to my family to have those quilts.  Besides, after all those quilts she's made through the years, the only one that was ever made for her by someone else, was the one she received from her mother when she got married.  Time to change all of that.

So, normally I challenge my readers to try a new quilt block or sewing pattern, but this time the challenge is different.  Here it is:  Go and forgive one person who you feel has wronged you.  Doesn't matter if they care (you don't even have to tell them if you don't want to) or that they accept your forgiveness or that they change at all---forgiving someone is about how it changes you.
Some ProjectsSocialTwist Tell-a-Friend

Saturday, March 16, 2013

Bloglovin

Follow my blog with Bloglovin
So apparently, Google Reader is going away.  I've signed up with Bloglovin for those who'd like to follow my blog that way--and I'd love it if you did--you'll find the widget on the side bar, just click!
BloglovinSocialTwist Tell-a-Friend

Wednesday, February 13, 2013

More Craftsy Freebies: Quilting

As promised, here's a review on the freebie mini classes over on Craftsy in the quilting department.

Creative Quilt Backs

Featuring Elizabeth Hartman (go Portland, Oregon!), this class teaches you how to calculate out the measurements for your quilt backing.  Yes, finally, quilt backs everywhere can go from hum-drum single fabrics to art.  Ms. Hartman is known for her fun modern style quilts--and quilt backs, and I have to add, is a super nice person in real life too!  While there is no specific pattern that comes with this class, by teaching you how to calculate everything out, Elizabeth is teaching you how to customize your backing to coordinate with whatever quilt top you've created.  She goes over several specific examples (I believe the ones shown go with her other Craftsy class, Inspired Modern Quilts), you can easily adjust and change things up to go with your pattern choice.  And, what do you know, I've got a couple several of quilt tops just waiting for a backing to be made so that they can go into the woohoo-I'm-done! pile.  The class is short enough to watch in a morning too (or during nap time), so you don't have to make a huge break in your schedule either...isn't that refreshing.  So, whether you're trying to use a few of those leftover blocks or have a pile of luscious scraps you can't bear to let go of (hey, your overflowing scrap basket will thank you), you can now put them to good use--on the back of your quilt! 

Block of the Month 2012

Here's a class that can be used as either a technique class for a particular block or a quilt along that ends with a 10 block sampler quilt.  Amy Gibson leads this one and its a fun class for getting your feet wet if you haven't tried a lot of quilt block styles.  (And yes, newbies could easily follow along with success!)  Each month covers a different type of block and gives a couple of examples for that style.  Here's the rundown in month order, beginning with January:  slashed blocks, half-square triangles, foundation piecing, English paper piecing, wonky log cabin, modern 9-patch, Dresden plates, stars, curved piecing, and paper piecing.  There are also lessons on how to put your quilt together so that you can actually finish it completely.

I admit, I'm not really a sampler quilt kind of person, especially with blocks that vary so widely in style, but I could make a few quilts out of the different blocks, or really anything, pillows, table runners, etc., and so found this to be an enjoyable class.  Some of the blocks you might already be familiar with such as the string blocks or the asterisk block (made quite a few of these in last years bees), but some of the others might just push you outside of your comfort zone or get you out of that comfortable rut into trying out something new.  Scared of curves or maybe unsure of paper piecing--give it a try through this class!  I for one am excited to try the circle of flying geese--I keep seeing all those fabulous ones on Flickr and really want to make my own.

Block of the Month 2013

Yep, that's right, round 2 for the block of the month class, this one with Laura Nownes--and its free too!  So, if you were really planning ahead, you could coordinate these blocks with the 2012 class ones and get a bigger quilt at the end.  I'm really glad they decided to go another year, I love trying out new blocks.  That's one of the things I love about quilting bees---trying something out without committing to a whole quilt of it!  So the line up for 2013 includes:  offset log cabin, partial seams, drafting, curved piecing, 45 degree triangles, y-seam construction (yikes!), 60 degree triangles, diamonds, tumbling blocks, applique basket, applique flowers & leaves, half-square triangles, flying geese, and mitered binding.  Wow!  This round will really push that comfort zone!

Not really into appliqued basket blocks---watch it anyway!  You'll learn a great technique that you can apply to other applique patterns.  That's the great thing about both the block of the month classes--you're learning techniques that can be applied to many future quilting projects.  While this one might be better suited for an intermediate quilter, I think an adventurous newbie could handle these.  Just take it slow and follow along.  See a particular block or technique you're interested in, jump right to that lesson (well, for the block of the month, you do have to wait until that month is here) and start watching!


I hope I've got you interested in checking out some of these online mini classes, and maybe even thinking about trying some of the paid classes too.  I find that Craftsy really listens to its customers and tries hard to find great solutions. 

Let me give you some examples of the great customer service you can expect.  I started signing up way back near the beginning and one of the frustrations some of us had was that you didn't know what the class would require in terms of materials prior to signing up.  I signed up for a couple of sewing classes only to discover that I'd need to order a whole mess of supplies, so I haven't gotten back to them until recently.  Craftsy now has a basic list of supplies with each class preview, so you have an idea of how you sit supply-wise!  (Detailed info, such as sewing pattern notion requirements, comes with the class.) 

Now, not everything is perfect yet on Craftsy, but they do try to have happy customers.  They offer a 30-day money back guarantee, so really you have nothing to lose.  You can contact them with questions and concerns and they get back you within 24 hours usually.

Oh, and about that class I hadn't gotten back to, it was a Gretchen Hirsch class.  By the time I got to it (just recently), I discovered that Craftsy had changed it from an instructor lead class to a group input class due to Gretchen not being as responsive as required.  (She basically went AWOL.)  Now, I don't know the entire story behind her ditching the class, and I'm not going to start a discussion on it, but I do know that as a person who shelled out $50 of hard earned money for a class with a specific instructor, I went from excited to disappointed.  I was a bit frustrated having gathered rather spendy supplies only to find no instructor.  (I'm in quite a few of Craftsy's classes, and definitely the instructors are top-notch and very responsive, so this was quite the surprise.  That's why I keep signing up for more classes---I'm getting high end teachers who answer my questions whenever I have one, so I'm learning a lot and I'm learning it from some of the best in their business and I'm learning it in my own home on my own time, no expensive travel or inconvenient schedule.)  I will say, that I'm glad they're keeping the class open for those already in the class, it isn't just canceled and there are many really knowledgeable people picking up the slack and helping others, but that's just not what I paid for. 

Upon hearing about my frustration (seriously, I had like one line in a discussion saying that I would have asked for my money back if this had been back at the beginning, but that I knew it wasn't typical of Craftsy instructors, and they read it!) they offered to switch me to a different class---and we're talking way past the 30-day mark!  That's right, they contacted me!  Who does that these days?!  I mean, when you buy a television and almost a year later say its not what I signed for, do they give you your money back or offer to change models for you just because you say you hadn't taken it out of the box yet?  No way!  Usually this much later, all you get is an "I'm so sorry" comment.  But not Craftsy.  Talk about customer service.  So like I said, you've got nothing to lose because Craftsy takes care of their customers.
More Craftsy Freebies: QuiltingSocialTwist Tell-a-Friend

Friday, January 25, 2013

Online Craftsy Class Reviews--A Handful of Minis

Well, if you haven't already heard about or checked out Craftsy, you are really missing out....really.  I've been enjoying their courses now for several months and have been learning things left and right.  Now, I'm sure you're thinking, "I just don't have the money to spend on classes right now" or "my work schedule just won't allow me to attend classes," but I'm here to tell you that if those are your excuses, you'll need to go shopping for some new ones.

First of all, these are online classes.  Yes, that's right, you take these classes on your computer--whenever you want (and if you have a laptop, where you want).  So, got a half hour before the kids come home from school, up at 2 AM wide awake, or just feeling the need to sit around in your pjs Saturday morning?  You can take your class (add headphones if you need to block out the kid's Saturday morning cartoons).  I really love the online format that Craftsy offers because I don't have huge blocks of time for packing up my stuff and driving off to classes, and I live in a small town and have to commute into a larger city to find any classes anyway.  I also have a schedule that sometimes opens up regular free time, but then won't for a month or so...and sometimes I just get busy with projects.  Having classes that wait for me is a blessing!  No more stress about trying to complete class projects before the class is done or the online time slot expires.  I can buy a class and "attend" five months later!  Which brings me to my next point...

...the cost of classes these days.  Have you checked out local city classes?  Wow!  I've seen classes range from $45 to over $200, and we're not talking college course hear, we're talking once a week for a month max.  Ouch!  Other online classes are only for a set length of time and then bye-bye instructor and videos.  My pocket book doesn't quite mesh with my desire for increased hands-on knowledge.  Craftsy was my solution (plus, even though I adore books, sometimes seeing something done is better).  Their most expensive class is $49.99 (with a money back guarantee).  Not bad for a never-ending, always available, classroom with top notch teachers (Kenneth King, Sandra Betzina, and Angela Wolf to name a few) and professional quality video.  Still, I admit, that's a little outside (okay, way outside) my budget despite the great offering.  But, Craftsy often puts their classes on sale for $30 and less (lots of times you'll find them for $9.99 and $14.99 around holidays)!  So, just keep an eye on their facebook page or sign up for the mailing list and you'll find the classes you want coming up on sale sooner or later.  I think I only bought one class at full price (a birthday gift from my sister), the rest have been $25 and down.  Now that's do-able!

So, as if that weren't enough, Craftsy has started offering mini classes--for FREE!  Yeah, I'm in love.  I sign up for all the free ones.  Now that is in anyone's budget.  You're probably wondering if I'm commissioned by Craftsy, I mean what with this infomercial and all...nope, I just am really excited to share the opportunity with you because I love learning and always get sooo frustrated when things are always so expensive (even books through Amazon can be pricey).  I get tired of not having the money for something, or finally having some spending money, but no time or would have to travel to another state or something. But, just so you know what you're getting yourself into, I thought I'd give a few quick reviews on some of the sewing mini classes I've recently finished up (I'll review the paid ones later).

First, let me say, some web browsers or computers might be a tad slow in the whole video buffering process and cause pausing.  I had this happen with Internet Explorer.  Try switching to Google Chrome, that  solved it for me.  I also found that getting the lesson started and then pausing for 30 seconds let the buffer get ahead in downloading so that it didn't have to pause to retrieve more info.  It's really not a big deal, and the high quality video is so worth it.

Bag-making Basics:  Reversible Tote and Zipper Pouch

This mini is information packed!  And so useful too.  I'm pretty sure next year's Christmas will somehow involve totes or bags for everyone.  Taught by Kirstin Link (from Sew Mama Sew), you will learn to make a basic zipped pouch (think make-up bag, snack bag, sewing project bag) and a reversible tote (think grocery bag, library book bag, going to church and keeping the kids entertained bag).  Each step was clearly explained and demonstrated--which was nice, because sometimes people skip steps and you're left scratching your head.  Kirstin is so calm and pleasant that pretty soon you're convinced that you too could make these bags--and you actually can because it is explained so well that it can easily be accomplished by even a new sewist.  I liked that the fabric requirements were based on fat quarters, but you could easily cut pieces from larger fabric amounts, so you can have fun with those designer fabrics or even use up those fat quarters in the bundles that didn't make the cut for you last quilt.  And, even though it is free, and so the teachers are not required to monitor and answer questions, Kirstin does a pretty fair job of responding.  Also, others in the class often chime in with good suggestions and helpful advice.  I also thought the zipper instructions were better than many of the patterns out there.

I signed up for this one mainly for the reversible tote.  In our area, the major nearby city has a plastic bag ban going into effect soon, and I'm sure other places will follow suit, so I'm in need of grocery bags and those weird plastic woven types in the stores just don't hold up well--I always end up with busted straps.  Plus, I like to walk to the store often and bag that can fold up easily, and look good, would be nice.  I'd never used a cloth bag until I got a free cloth bag from the Green Bag Lady in a giveaway and I've really enjoyed having it, so I know I would use more if I had them.  I think I'll make a waxed canvas bag for the rainy season (its Oregon, I need waterproof sometimes) and some basic cotton ones for sunny days.  My goal is to not need any more of those plastic bags that seem to multiply in the dark and overwhelm the little spot we store them in.  I'll probably lengthen the straps given in the class so that I can wear the bag over my shoulder when walking rather than hand-carry.

Bag-making Basics:  Drawstring Bag & Bucket Bag

Another mini with Kirstin Link that you'll find extremely useful and use again and again.  This class has the same great video quality and instruction style as the previous bag class, so you won't be disappointed in that regard.  Each step is covered and supplies can be found easily.  I really like the idea that you can customize these bags so easily with changes in fabric, trim, pockets, and size.  You'll learn to make a padded, cylindar shaped tote or bucket bag (fill it with your latest knitting project or let a child have it to carry toys in) and a lined drawstring bag, so useful for holding all sorts of things like gear, gift bags, laundry sacks, etc.  All of you yarn people out there will love the little bucket bag to tote your projects around in.  It's just the right size and with the padded sides it doesn't flop over. 

I've already used the drawstring bag information to make pillowcases for my brother, so you can see that the information easily translates to other projects.  I'll probably make myself a laundry bag next or maybe some camping gear sacks with the drawstring bag info.  I think the bucket bag, made larger, would also make a great fabric scrap bag.

Sewing Machine Feet from A to Z

This is a really short class, even for a mini.  I watched it this morning while waiting for it to get light enough to put the hummingbird feeder back out.  The information is also extremely basic, with just the most common sewing feet introduced.  There are no projects and the machine feet are briefly explained and demonstrated.  Still, the instructor comes off as friendly and approachable and the video even has still shots of the feet so you can really see them.  And, if its been awhile since you've used some of those extra feet or you're wondering what to do with some of the ones that came with your machine, its a good place to start.  I would also recommend it for someone new to sewing who might be wondering what foot to add to their arsenal next.  The feet introduced were zipper, invisible zipper, gathering, rolled hem, blind hem, buttonhole, braiding/couching, quarter inch, roller, and darning/free-motion.  So, even though it is a shorty, go watch it and refresh your memory or pick up some tips.  Maybe they'll make another class with more feet--or even better, one that shows how to use attachments for vintage Singers!

There's also a Sewing Machine 911 class that gives some basic machine care, but I haven't watched that one yet...I got distracted when they added the free pizza making class with Chef Reinhart!   

Well, that's a whole lot of typing, but I hope you'll try out some of these classes, they do offer great information, are beginner friendly, and the idea that a company has gone out of its way to provide a quality free item is really something that should be supported.  There are free classes in other topics too---food, cake decorating, jewelry, knitting, etc. 

Next time...free mini quilting class reviews.  And maybe a review on the pizza---I mean pizza class.
Online Craftsy Class Reviews--A Handful of MinisSocialTwist Tell-a-Friend

Saturday, January 12, 2013

First two bee blocks of 2013

2013 is off and kicking--and I've already got my two bee blocks done!

The first went to craktpot (Teri) in the Bee White Black quilting group.  Teri sent some great architectual fabric and a lovely one with a caged raven on it (LOVE this one) to be used in her block.  I couldn't help but think:  Steampunk!  Our instructions were to avoid curves, circles and really wonky lines but use rectangles, squares and slightly off lines (like a pencil line that is hand drawn and went a little off).  Think mild Gees Bend style.  I have a hard time breaking out of straight lines for these type of quilt blocks, but I did make some deliberately slightly off.


Not quite all straight lines--its a control thing.


The second block went to Ursi (by niveas) in our Sew Buzzy group.  She sent out some fabulous Tula Pink fabric and requested we make one of those Japanese + or X blocks.  We used the tutorial from City Stitches.  This one is very quick to cut and sew...unless you make the mistake I did, and sew the X parts in wrong and make an O instead!  Oh well, nothing a little seam ripper time can't fix.

This one makes a great scrappy block!

What have you started off with in 2013?
First two bee blocks of 2013SocialTwist Tell-a-Friend

Christmas 2012--More Photos

Well, blogger has been unwilling to let me add images for a few days, so finally here's a few more photos from this Christmas....

We made gingerbread cookies this year, but we don't stand on tradition.

We make regular gingerbread girls and boys...

Yum! Cinnamon candies and icing make for a nice simple gingerbread man.

 ...and not so regular.

Zombies and vampires, oh my!

Our favorite recipe is an old pioneer one, only we substitute Crisco vegetable shortening for the lard.  I like how mild it is which goes perfectly with cocoa or cider.

Mom piping out the requests.

Lots of presents all around.  We had a really great year and everyone was very generous and thoughtful.


Everyone got presents this year...

...a new outfit for Kara,


This adorable Supergirl outfit was handmade and purchased on Etsy.  That's Krypto in the wagon, he's Kara's best friend!
 and one for Adyn too.
A retired AG outfit with a cute button down flannel shirt and corduroy pants.  That's  me right behind her in my new flannel shirt.  And of course, Stars the Little had to sneak in for the photo!


Christmas 2012--More PhotosSocialTwist Tell-a-Friend
Related Posts Plugin for WordPress, Blogger...