I've had enough of trying to deal with Blogger! It's not that I don't love the ease of use (most of the time), the free site, and having a blog that is just for fun, but not being able to blog or having problems when I do, not having the exact look I want, and wanting to go further with this blog makes this not so much fun. Especially now that Blogger is, once again, having compatibility issues with the latest Internet Explorer version. (How many error messages do I need to see?)
This just isn't working for me and I find myself avoiding my own blog--which isn't fair to my readers or myself. When Google announced their new content use policy stating they could take and use my photos and content however they wanted, I decide that was it, I'm out of here!
So....
After quite a bit of thought and research, I've decided to move Raggie Girls to its very own domain! I would love it if you would join me at my new location:
http://raggiegirls.com
It's not completely finished yet, but this old blog is transferred (I'm in the process of checking each post for needed corrections to formats and links) and the main structure is all there. (I'll leave this blog up for a little while longer though, but won't be posting to it.)
I'm really excited about this change! A fresh new blog (with all the wonderful old information still available) will be just the thing to get me reinvigorated with blogging. I'm already feeling pushed to put more effort into my photography and posts!
What will the new blog have? Besides actual blog posts, there will be pages for reviews, articles and tutorials, better layout, social media links and, eventually, my own patterns! I'm also able to have sponsors/ads and my etsy shop linked which will be a huge help to me as I go full fledged into my crafting business.
Anywho, I hope you'll consider moving on over with me and continue to be a part of Raggie Girls.
Cheers,
Shayla
Friday, January 3, 2014
Wednesday, September 11, 2013
Some Summer Bee Blocks
 |
| Cross or Plus block made with black and white fabrics for the cross. We were told we could make the cross part any size and any location within the block. |
 |
| These blocks are called a digital pinwheel block and were inspired by one of the quilts in Amy Ellis' book Modern Neutrals. |
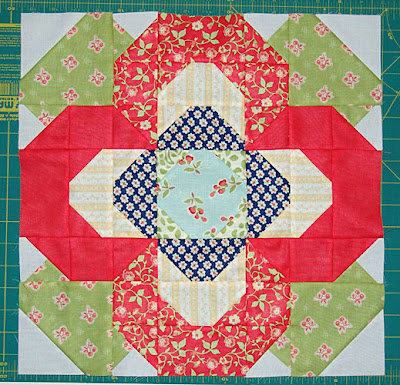 |
| This flower block was from a tutorial from the bee member's blog. You have to pay attention to what you're doing, but the end result is lovely! |
 |
| I'm sure you've seen these Japanese + and X blocks popping up all over the internet. This one is the 7.5 inch one made using the Badskirt Amy tutorial. |
 |
| A pinwheel block made using the Sew Mama Sew tutorial. |
 |
| This block was called Ring-Toss and I used the tutorial on Woodland Cottage Designs. |

Labels:
Bees and Swaps,
Quilts and Blankets,
Tutorials
Monday, August 19, 2013
Please accept my apology...
To those who were following along for the sew along, I completely apologize for the lack of a follow up post! I had written a skirt tutorial for you that just needed photos....and then life got majorly in the way. So, I will be catching up on posts for the Sew Along shortly, as well as, showing some bee blocks, tutorials, etc. Please have patience.
In the between time, know that it is really good to have hot water, working kitchen faucets, toilets that flush, medicine for sick canines, and most importantly, family and friends that help when life gets crazy! So, count your blessings.
Please accept my apology...In the between time, know that it is really good to have hot water, working kitchen faucets, toilets that flush, medicine for sick canines, and most importantly, family and friends that help when life gets crazy! So, count your blessings.

Wednesday, July 17, 2013
Etsy Shop Prep
Sorry to those following along for the long pause in blogging. I have been unemployed for a few months now looking for a job--no, still haven't found one--but, I do have a plan. I decided to give my Etsy shop another go!
I actually had opened one quite awhile ago and had a few things listed, but my job and life took up too much of my attention to really get things going properly. Now that some of that is out of the way, I've been working on getting things set up. I also talked my mom and sister into trying a few of their items too, so there'll be a bit more variety.
So, what's taking so long? Well, mainly the CPSIA details. The federal government has added a few new huge regulations for those making children's toys and products which complicate the berjeebers out of it all. (I know, I've been watching videos and reading documents until my eyes want to bleed from all the legal talk!) It also can make things very expensive unless you very carefully choose your toy components because everything has to meet the new lead and phthalate level requirements, as well as, the safety standards. That means expensive third party testing.
There are many things like fabric, thread, Velcro, wood, pearls, etc. that are exempted from testing because they've already proven that there's no lead (and not being plastic, obviously no phthalates) in them. BIG sigh of relief there! But things like plastic safety eyes, buttons, rhinestones, zippers, snaps, etc. all still need testing. Fortunately, for small batch makers like myself, we can use the General Conformity Certificate (GCC) of the component's company. Unfortunately, many manufacturers are simply avoiding testing by saying that their products aren't made specifically for 12 years or younger and so they won't test according to CPSIA requirements. This makes it a bit frustrating when you want to use something like say a plastic button or maybe a cool vintage glass button on a doll or something as simple as a sew-on snap. I think the least expensive lab I saw was charging around $45 for one particular lead level test. Add to that lead in surface coatings (such as paint on a wooden block) or phthalate totals (such as certain plastic parts) and you can see how costs start to rise. And, this is for each item. So, if you start seeing these items missing from handmade toys, don't be surprised. (Although, I know there are many handcrafters who are just ignoring it all.)
My solution is to separate my handcrafted creations into categories for children (3 to 12 years old) and the "adults" (older than 12 years). I will continue to make my heirloom and art dolls and creatures for those who are old enough to not put their buttons in their mouths, but I will also make "child safe" versions without untested items. So, for example, a doll dress might have Velcro or wooden or mother-of-pearl buttons for closures for the child's version while the heirloom version might have sew-on snaps and resin buttons instead. Animal type creatures will have felt or embroidered eyes instead of my usual button eyes (although I do embroider many of the heirloom/art faces too). So, for now, there will simply be some items not available in a child's version. As I get testing documentation in place, I can add these components to my child versions.
Don't worry, I have some lovely dolls and toys in the works for children---they'll never miss the rhinestones! For now though, I've revamped my shop look, designed labels and cards, drawn up new patterns and gathered my old ones, picked out fabrics and begun cutting away. Now, I'm just waiting for my CPSIA regulated woven labels and contact cards to arrive.
So, if you buy handmade toys (and I certainly hope you do), support those crafters who have gone to all the effort to meet the requirements of CPSIA---it really is a huge effort.
I hope you'll come visit my shop once I get some of my creations in there for you to see!
And now, I have a skirt to finally make...
Etsy Shop PrepI actually had opened one quite awhile ago and had a few things listed, but my job and life took up too much of my attention to really get things going properly. Now that some of that is out of the way, I've been working on getting things set up. I also talked my mom and sister into trying a few of their items too, so there'll be a bit more variety.
So, what's taking so long? Well, mainly the CPSIA details. The federal government has added a few new huge regulations for those making children's toys and products which complicate the berjeebers out of it all. (I know, I've been watching videos and reading documents until my eyes want to bleed from all the legal talk!) It also can make things very expensive unless you very carefully choose your toy components because everything has to meet the new lead and phthalate level requirements, as well as, the safety standards. That means expensive third party testing.
There are many things like fabric, thread, Velcro, wood, pearls, etc. that are exempted from testing because they've already proven that there's no lead (and not being plastic, obviously no phthalates) in them. BIG sigh of relief there! But things like plastic safety eyes, buttons, rhinestones, zippers, snaps, etc. all still need testing. Fortunately, for small batch makers like myself, we can use the General Conformity Certificate (GCC) of the component's company. Unfortunately, many manufacturers are simply avoiding testing by saying that their products aren't made specifically for 12 years or younger and so they won't test according to CPSIA requirements. This makes it a bit frustrating when you want to use something like say a plastic button or maybe a cool vintage glass button on a doll or something as simple as a sew-on snap. I think the least expensive lab I saw was charging around $45 for one particular lead level test. Add to that lead in surface coatings (such as paint on a wooden block) or phthalate totals (such as certain plastic parts) and you can see how costs start to rise. And, this is for each item. So, if you start seeing these items missing from handmade toys, don't be surprised. (Although, I know there are many handcrafters who are just ignoring it all.)
My solution is to separate my handcrafted creations into categories for children (3 to 12 years old) and the "adults" (older than 12 years). I will continue to make my heirloom and art dolls and creatures for those who are old enough to not put their buttons in their mouths, but I will also make "child safe" versions without untested items. So, for example, a doll dress might have Velcro or wooden or mother-of-pearl buttons for closures for the child's version while the heirloom version might have sew-on snaps and resin buttons instead. Animal type creatures will have felt or embroidered eyes instead of my usual button eyes (although I do embroider many of the heirloom/art faces too). So, for now, there will simply be some items not available in a child's version. As I get testing documentation in place, I can add these components to my child versions.
Don't worry, I have some lovely dolls and toys in the works for children---they'll never miss the rhinestones! For now though, I've revamped my shop look, designed labels and cards, drawn up new patterns and gathered my old ones, picked out fabrics and begun cutting away. Now, I'm just waiting for my CPSIA regulated woven labels and contact cards to arrive.
So, if you buy handmade toys (and I certainly hope you do), support those crafters who have gone to all the effort to meet the requirements of CPSIA---it really is a huge effort.
I hope you'll come visit my shop once I get some of my creations in there for you to see!
And now, I have a skirt to finally make...

Monday, June 3, 2013
RATZ and Super Swaps
Just a quick post to share some swap items I sent out.
The first is a coffee cozy (which, incidentally, also fit around the individual sized Ben & Jerry's ice cream containers...just sayin') made for my secret partner in RATZ (Rapid and Tiny Zakka) swap. She had lots of likes to work off of, which somehow makes it harder, including red and white combos. She also seems to have a liking for the French General style fabrics. (Warning: lousy inside-at-night photos to follow.)
While I was making coffee cozies, I also made one for my Super Swap partner. (I used the pattern and tutorial found at InColorOrder by Jeni Baker for guidance.) For my partner, I had Michelle (a.quilter.2) who is quite talented and based on her favorites reminded me of my younger sister--lots of fun, whimsical, modern likes. She also likes giraffes, but more on that in a second. So I made her a bright kind of silly cozy with a cute little worm in the center (you know...early bird gets the worm...okay, maybe its only hilarious when you're up really late). The center is made in log cabin block style only using folded strips of fabric (think iris folding only not as complicated).
Now to the actual swap item for Super Swaps---this round was pincushion or small animal. And, as sort of mentioned earlier, I made a giraffe for Michelle. When I saw that she liked animals, particularly owls and giraffes, I knew I had to make her a little creature. However, when I decided on a giraffe and went looking for a pattern, there were almost none out there! The few that did exist were more floppy or child styled or were out of print. Mmph! I did find another cute one, but the etsy seller was on vacation. Left high and dry, I was. So, I made a pattern myself (go me!) and created my very own giraffe!
I used felt for the ears, regular quilting cotton for the body and for the antlers I made two tiny French knots out of wool embroidery yarn. I used variegated DMC perle cotton floss and wool embroidery yarn for the mane and tail.
Michelle likes Tula Pink which is what I used for the body---which worked out perfectly as I had all the color coordinating flosses, yarns and felt. It was meant to be. :)
Figuring out the gusset (underneath belly part) was the hardest, (I think I might tweak it just a touch more) but after three test ones, I got it to where I liked the results. This giraffe is just the right size to be either a fun little shelf sitter or a pin cushion, so Michelle can use it either way.
I need to write up some instructions, but then I'm going to have the pattern available for others to enjoy. I think I may make a larger size too that would be more child toy size. We'll see how the pattern translates to the larger scale. Anyone interested? First though, I need to make me a giraffe--this one was hard to give away!
RATZ and Super SwapsThe first is a coffee cozy (which, incidentally, also fit around the individual sized Ben & Jerry's ice cream containers...just sayin') made for my secret partner in RATZ (Rapid and Tiny Zakka) swap. She had lots of likes to work off of, which somehow makes it harder, including red and white combos. She also seems to have a liking for the French General style fabrics. (Warning: lousy inside-at-night photos to follow.)
 |
| I really liked the button (a tulip) on this. Also the added bit of satin ribbon. |
 |
| Just love the feminine feel of this softly colored fabric! |
While I was making coffee cozies, I also made one for my Super Swap partner. (I used the pattern and tutorial found at InColorOrder by Jeni Baker for guidance.) For my partner, I had Michelle (a.quilter.2) who is quite talented and based on her favorites reminded me of my younger sister--lots of fun, whimsical, modern likes. She also likes giraffes, but more on that in a second. So I made her a bright kind of silly cozy with a cute little worm in the center (you know...early bird gets the worm...okay, maybe its only hilarious when you're up really late). The center is made in log cabin block style only using folded strips of fabric (think iris folding only not as complicated).
 |
| Isn't that a cute little worm? The button is actually two buttons stacked. |
 |
| I had some gray houndstooth, which coordinated with the gray on the front, plus houndstooth is just fun. |
Now to the actual swap item for Super Swaps---this round was pincushion or small animal. And, as sort of mentioned earlier, I made a giraffe for Michelle. When I saw that she liked animals, particularly owls and giraffes, I knew I had to make her a little creature. However, when I decided on a giraffe and went looking for a pattern, there were almost none out there! The few that did exist were more floppy or child styled or were out of print. Mmph! I did find another cute one, but the etsy seller was on vacation. Left high and dry, I was. So, I made a pattern myself (go me!) and created my very own giraffe!
 |
| Hello there! |
I used felt for the ears, regular quilting cotton for the body and for the antlers I made two tiny French knots out of wool embroidery yarn. I used variegated DMC perle cotton floss and wool embroidery yarn for the mane and tail.
 |
| Isn't this little guy a cutie? I did the mane in loops, but it would look cute as fringe too. |
Michelle likes Tula Pink which is what I used for the body---which worked out perfectly as I had all the color coordinating flosses, yarns and felt. It was meant to be. :)
Figuring out the gusset (underneath belly part) was the hardest, (I think I might tweak it just a touch more) but after three test ones, I got it to where I liked the results. This giraffe is just the right size to be either a fun little shelf sitter or a pin cushion, so Michelle can use it either way.
 |
| You can see the tail here--it is braided and matches the mane. |
I need to write up some instructions, but then I'm going to have the pattern available for others to enjoy. I think I may make a larger size too that would be more child toy size. We'll see how the pattern translates to the larger scale. Anyone interested? First though, I need to make me a giraffe--this one was hard to give away!
 |
| Could you stick a pin in him? |

Sunday, May 19, 2013
Blogger Problems--Stay Tuned for Part 3 of Challenge 1 in the GBSB Sew Along
Blogger keeps trying to log me out as I type, so rather than log back in for the 20th time (literally), I'm going to just say have a great day and we'll pick back up later on our sew along progress. (You could always prewash and iron your fabric while you wait.)
I've also got a little trouser tutorial coming and some crafty goodness, so hopefully Blogger will behave itself tomorrow!
Blogger Problems--Stay Tuned for Part 3 of Challenge 1 in the GBSB Sew AlongI've also got a little trouser tutorial coming and some crafty goodness, so hopefully Blogger will behave itself tomorrow!

Wednesday, May 15, 2013
Lulu the Elephant and a String Block
Just a little peek at some of the things I've been working on...
For April, Deanna (aka Spongebobette), a member of Bee White Black, requested a string block. She asked us to use the solid gray for the center string and then towards the centers use the red solid. The red was to be lined up as closely as possible. This was harder than it would seem as the strips of fabric are different widths, so you have to plan carefully to get near the same point for sewing on the red! Each square of is 6.5 inches, making a 12.5 inch block when sewn together.
I also completed this little elephant softie for my younger sister's birthday. (I don't know what she'll name it, but we'll just call her Lulu for now.) Lulu is made from an upcycled dress that was one of my sister's favorites. In fact, I did a makeover on the dress once changing it from a V-neck swing dress to a cross-over faux wrap A-line dress with white piping down the overlap while also widening it at the waist. I think she wanted to try and remake it again when that didn't fit, but I wasn't game so the dress went into the thrift shop pile. Later, I got to thinking about it and snuck it out of the pile for repurposing into the elephant. I've been hiding this for almost a year now!
Lulu is made from Simplicity 2613 like Marvin. She's sporting a lovely 1 inch wide white satin ribbon. Don't you love the flower around her eye? Yeah, that's the power of fussy cutting!
Lulu the Elephant and a String BlockFor April, Deanna (aka Spongebobette), a member of Bee White Black, requested a string block. She asked us to use the solid gray for the center string and then towards the centers use the red solid. The red was to be lined up as closely as possible. This was harder than it would seem as the strips of fabric are different widths, so you have to plan carefully to get near the same point for sewing on the red! Each square of is 6.5 inches, making a 12.5 inch block when sewn together.
 |
| I like the bold red in the center! |
I also completed this little elephant softie for my younger sister's birthday. (I don't know what she'll name it, but we'll just call her Lulu for now.) Lulu is made from an upcycled dress that was one of my sister's favorites. In fact, I did a makeover on the dress once changing it from a V-neck swing dress to a cross-over faux wrap A-line dress with white piping down the overlap while also widening it at the waist. I think she wanted to try and remake it again when that didn't fit, but I wasn't game so the dress went into the thrift shop pile. Later, I got to thinking about it and snuck it out of the pile for repurposing into the elephant. I've been hiding this for almost a year now!
 |
| Lulu goes well with the miniature quilt on my wall, hmm... just kidding! |
Lulu is made from Simplicity 2613 like Marvin. She's sporting a lovely 1 inch wide white satin ribbon. Don't you love the flower around her eye? Yeah, that's the power of fussy cutting!

Subscribe to:
Posts (Atom)


