Here's where we left off:
To begin sewing, take the center square and that small piece directly to the right of it and sew using a 1/4 inch seam allowance with right sides together. (By chain stitching the blocks, the sewing will move along faster, just keep track of which ones go where.)
Press each piece by setting the seam first (this is where you simply press the sewn pieces as is--without opening them up) and then pressing open. I like to have my seams pressed towards the darker fabric, especially when working with white, but it really doesn't matter as long as you are consistent!
See how my seams are opposite between each partner block--it will help reduce bulk later and keeps the seams from showing much with the white fabric.
Here's what it will look like with the other pieces:
Next, sew the center square section to the piece directly above it, right sides together. I like to keep the center square section on top so that I can make sure the seam allowance doesn't get turned funny and sewn that way. Be sure and line up the bottom and left edges of the pieces so that you'll have an even inner edge.
Sew with the same 1/4 inch seam allowance. Again, chain stitching will keep things moving right along.
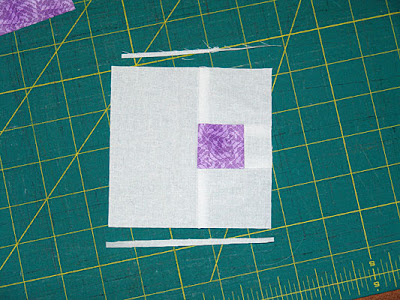
Press as before, with seam allowances towards the darker fabric. You can see how this piece sticks out beyond the center section, don't worry about it, that extra will be trimmed off later.
Now repeat these steps with the piece directly below the center square section. Line the pieces up so that the top and left edges are even--you want the inner edge to be straight and even for attaching to the last piece.
Sew and press open, so that you're pieces look like this:
Here's a quick peek at the backs, so that you can see how I've pressed the seam allowances:
You are now ready to attach the final piece of each block.
Flip the center square section over on to the left side piece, right sides together. Line them up so that the top and right edges are even. (Sorry my photo is sideways, the top of the image is the left.)
Sew and press as with the other pieces. You will now have blocks resembling the letter "F".
Using a ruler and rotary cutter, trim off the parts that stick out from the main block--you're in the process of squaring the block, so try to straighten the edges so that the center square piece looks like it is straight and not tilted.
Square up the rest of your block by trimming away any excess or uneven sides.
Now, square up each of your individual blocks to the same size.
Once all of your blocks are sewn and squared up, you are ready to begin laying out the quilt--that will be in Part 3!


No comments:
Post a Comment