Okay, I've had a few questions concerning my free patterns and tutorials, so here is the answer for everyone. If I get any additional questions, I'll try and update this post so any future inquiries can find the info in the categories link. I hope to provide many, many tutorials and patterns for others to enjoy, so this is important to keep it fun and fair!
I am excited to provide free patterns and tutorials to home sewers everywhere. I know how much I enjoy when others share with me. I hope that you'll enjoy using these, after all, I spent sewing time working up the instructions, step-by-step shots and patterns just for you!
Please keep in mind that I reserve all rights on my photos, patterns, tutorials and blog posts, all of which were created by me, Shayla M. Sharp. These materials may not be republished or distributed without my express written permission. Tutorials and patterns found through links to other sites that I provide are copyright protected by those individuals and cannot be used without their permission. Sorry, I can't give it for them either.
Please DO any of the following:
Sew! Use the patterns to make loads of projects for yourself, your family and friends. Post photos of your work online. Tell others about them. Link to my blog posts.
Please DO NOT do any of the following:
Do not republish material from my blog on other sites. Do not distribute hard copies of patterns or tutorials to others. Do not distribute electronic copies of patterns or tutorials via e-mail. Do not resell my patterns or tutorials (including as part of a kit). Do not use my patterns or tutorials to mass-produce items for sale on Etsy, Artfire, at craft fairs/bazaars, or in any other commercial venue.
Instructors & Shops:
•Instructors and shops do not have permission to sell or distribute my patterns or tutorials. Instead, please include my blog address in your kits and class information, along with instructions telling your customers/students where they can download the free pattern
•Apart from a supplies list, materials from my patterns and/or blog may not be used to promote your class or kits. This includes photos, pattern excerpts, and blog posts.
Quilting Bees:
A few things to keep in mind:
•Please don't hesitate to link to my blog or my Flickr photos, but please don't copy/republish them anywhere.
•Please refer your bee members to my blog, rather than e-mailing them copies of a pattern.
Thanks for being willing to respect my work!
Tuesday, October 26, 2010

Hidden Diamond Mug Rug
For the Scrappy Mug Rug Swap, my partner was Laura. She is a mom who lives in Canada and loves all things scrappy, pink and chocolate. So, I designed a mug rug just for her. It was as scrappy and pink as I could make it. In fact, I used a bit of every pink in my stash!
I designed the pattern (yes, there is a pattern for you to use) with tiny one inch squares and half squares--tricky little buggers to work with too! I used a foundation pattern to help with keeping everything in the right place. I chose not to put a binding on this one. Instead, I sewed the layers pillowcase style, turned, stitched closed the opening and then topstitched along the interior border line to create a faux binding effect. (Don't know how to make a faux binding--here's a great tutorial already created by my quilting friend Andrea!)


Hidden Diamond Mug Rug Color Sheet
Hidden Diamond Mug Rug Foundation Pattern A
Hidden Diamond Mug Rug Foundation Pattern B
Instructions:
To sew this little mug rug, first, precut your little squares and half squares triangles. When I'm working with such small pieces in foundation quilting (also known as paper piecing), I'm more generous with my cutting. So, give yourself a bit more than the typical quarter inch seam allowance, especially on the half square triangles. If you want, print out the color sheet and color in your design plan so that you know how many of each fabric you need and where to place them.
After printing out both foundation pattern sheets, cut out the individual strips (the cutting line is the lighter outer line, the sewing line is the darker inner lines). Strips are easy to foundation piece. Just start at one end and work towards the other. (Here's a great tutorial for those not familiar with foundation piecing.) Use a shorter than normal stitch length for easier removal of the paper later. Press as you go. Once each strip is done, trim along the cutting line. Then sew the strips together. Press as you go. When everything is together, carefully remove the paper backing.
Cut out backing and batting a bit larger than desired final size. If you plan to put a regular binding on, then quilt the layers first, trim square and bind. If you are using the faux binding method, follow the tutorial link listed earlier. You're done! Make a few and give them to friends for holiday gifts, they'll love you!
I designed the pattern (yes, there is a pattern for you to use) with tiny one inch squares and half squares--tricky little buggers to work with too! I used a foundation pattern to help with keeping everything in the right place. I chose not to put a binding on this one. Instead, I sewed the layers pillowcase style, turned, stitched closed the opening and then topstitched along the interior border line to create a faux binding effect. (Don't know how to make a faux binding--here's a great tutorial already created by my quilting friend Andrea!)

The gray used to offset the pink is Kona charcoal. For the backing, I used some more pink fabric from my stash which had a fun kind of stitched look to the design. The batting was just some cotton Warm & Natural batting. I quilted around the diamonds and inner side of the pink border with some Sulky premium 40 wt. rayon thread in Light Silver that had a nice sheen to it.

This mug rug made a fun scrappy gift that has endless coloring possibilities. I've named the mug rug pattern Hidden Diamond because of the center design. Below are three PDF files. A color sheet and the foundation patterns, in case you'd like to make your own scrappy Hidden Diamond mug rug. (Please remember that this pattern is for personal use only.) When printing, individual squares should measure one inch on the sewing lines. You may have to scale your printing depending on your individual printer's settings.
Hidden Diamond Mug Rug Color Sheet
Hidden Diamond Mug Rug Foundation Pattern A
Hidden Diamond Mug Rug Foundation Pattern B
Instructions:
To sew this little mug rug, first, precut your little squares and half squares triangles. When I'm working with such small pieces in foundation quilting (also known as paper piecing), I'm more generous with my cutting. So, give yourself a bit more than the typical quarter inch seam allowance, especially on the half square triangles. If you want, print out the color sheet and color in your design plan so that you know how many of each fabric you need and where to place them.
After printing out both foundation pattern sheets, cut out the individual strips (the cutting line is the lighter outer line, the sewing line is the darker inner lines). Strips are easy to foundation piece. Just start at one end and work towards the other. (Here's a great tutorial for those not familiar with foundation piecing.) Use a shorter than normal stitch length for easier removal of the paper later. Press as you go. Once each strip is done, trim along the cutting line. Then sew the strips together. Press as you go. When everything is together, carefully remove the paper backing.
Cut out backing and batting a bit larger than desired final size. If you plan to put a regular binding on, then quilt the layers first, trim square and bind. If you are using the faux binding method, follow the tutorial link listed earlier. You're done! Make a few and give them to friends for holiday gifts, they'll love you!

Monday, October 18, 2010
Strings, Gnomes and Birds
Here's a peek at the last of September's bee blocks (I know, posting way late).
First, a string or strip block for neshamamama in the Moody Blues quilting bee. Check out those lovely batiks she sent to use. All strips were sent pre-cut, we just had to pick where they went and sew them in. A couple of my center strips were not quite the full 2-inches which caused them to end up not quite as wide as the others, so not lining up as nicely. But, I think once the block is in with the others it won't be super noticable. Careful cutting gives best results, but in the end, quilting isn't about perfection, its about art and creation of something loved.

The last two blocks for September both went to Kendra in the Bee Scrappy quilting bee group. Kendra is making a quilt for her 9-year old son and requested scenic blocks with white backgrounds and images of houses, gnomes, birds, woodland and whimsical. She made this inspiration mosaic for us as a guide.
My first block is a forest with a gnome based on one of the quilts she had in the mosaic (she actually had it twice, so I figured she really liked it). The pattern is my own version, created with the use of Electric Quilt 6, and it is a paper-pieced one. It was actually really easy to do. I like how it turned out.

For the second block, I created a whimisical bird block. This one is my own design, also made in EQ6, and paper-pieced. It needed lots of tweaking, even made me feel a little bit crazy, but I think in the end, it works.

First, a string or strip block for neshamamama in the Moody Blues quilting bee. Check out those lovely batiks she sent to use. All strips were sent pre-cut, we just had to pick where they went and sew them in. A couple of my center strips were not quite the full 2-inches which caused them to end up not quite as wide as the others, so not lining up as nicely. But, I think once the block is in with the others it won't be super noticable. Careful cutting gives best results, but in the end, quilting isn't about perfection, its about art and creation of something loved.

The last two blocks for September both went to Kendra in the Bee Scrappy quilting bee group. Kendra is making a quilt for her 9-year old son and requested scenic blocks with white backgrounds and images of houses, gnomes, birds, woodland and whimsical. She made this inspiration mosaic for us as a guide.
My first block is a forest with a gnome based on one of the quilts she had in the mosaic (she actually had it twice, so I figured she really liked it). The pattern is my own version, created with the use of Electric Quilt 6, and it is a paper-pieced one. It was actually really easy to do. I like how it turned out.

For the second block, I created a whimisical bird block. This one is my own design, also made in EQ6, and paper-pieced. It needed lots of tweaking, even made me feel a little bit crazy, but I think in the end, it works.

I'll be putting both block patterns on the blog for everyone to try later. I want to make another one of the bird ones with all my adjustments to make sure it turns out perfectly. (Don't you just hate spending time on a block only to find out part way through that something doesn't work out like you were hoping?) So, keep an eye out for them--then you can start your own whimsical woodland quilt!
Saturday, October 9, 2010
More Flying Geese Blocks
Another request for flying geese quilt blocks--this time with some color! In my Sew Buzzy quilting group, Melinda (quirky granola girl) asked us to make her flying geese blocks--our choice--using her gray fabric as the background and the various colors for the geese. She sent a lovely assortment of blues, greens, yellows and oranges. Because one of our group members went MIA on us, I decided to make her two, so she wouldn't lose a block to someone else's failure. (Don't worry, we found a great replacement--although we are still waiting for the MIA member to return 3 months worth of blocks/fabric. Not cool!)
My first block is from the pattern Tradewinds found on Quilter's Cache (an excellent source of free block patterns, BTW). I actually drew it in EQ6 (Electric Quilt 6) so that I could play with colorings as all of the pieces sent were smaller, so I needed to plan out where I put each fabric in the block. (You could do the same basic thing with graph paper if you didn't have the software.)

The second block I chose was the Starshine pattern, also from Quilter's Cache. I did add some fabric, the yellow, from my own stash simply because at this point I didn't have enough of one color for all the needed parts (Melinda was only expecting one block after all). I chose a yellow that had tones coordinating with the other yellows she had sent. I also ended up adding a thin gray border because the block printed out to only 11.5 inches instead of the 12.5 inches, despite setting the print choice to 100%--sometimes printers are just obnoxious. This one didn't have a 1 inch square on it to check measurements, so I didn't know this until it was finished, grr.

I really liked these colors together, and I admit, the gray trend is slowly growing on me. Both blocks ended up looking pretty good, although, I would not recommend them for beginning paper-piecers, particularly the Starshine block.
My first block is from the pattern Tradewinds found on Quilter's Cache (an excellent source of free block patterns, BTW). I actually drew it in EQ6 (Electric Quilt 6) so that I could play with colorings as all of the pieces sent were smaller, so I needed to plan out where I put each fabric in the block. (You could do the same basic thing with graph paper if you didn't have the software.)

The second block I chose was the Starshine pattern, also from Quilter's Cache. I did add some fabric, the yellow, from my own stash simply because at this point I didn't have enough of one color for all the needed parts (Melinda was only expecting one block after all). I chose a yellow that had tones coordinating with the other yellows she had sent. I also ended up adding a thin gray border because the block printed out to only 11.5 inches instead of the 12.5 inches, despite setting the print choice to 100%--sometimes printers are just obnoxious. This one didn't have a 1 inch square on it to check measurements, so I didn't know this until it was finished, grr.

I really liked these colors together, and I admit, the gray trend is slowly growing on me. Both blocks ended up looking pretty good, although, I would not recommend them for beginning paper-piecers, particularly the Starshine block.
Sunday, October 3, 2010
Pincushion Swap
The Scrappy Pincushion Swap just finished up with a deadline of October 1 and I got mine sent off on time! My little pincushion has quite a ways to travel, not to mention traversing the dangers of customs officials, so it won't arrive to its new home for a bit.
I used the Wendy the Bird pattern I found from LollyChops for the main body and altered the wings. The blue fabric is a Robert Kaufmann fabric that I thought had a feather sort of look to it. Eyes are made with silver sequins and small black beads. The wings have blue hand stitching and rows of sequins for a little extra sparkle. They are made from felt, with the backs of each wing having wool felt. Perfect for holding needles!


I also sent three pin toppers created by Marla Sharp. They are on 1.5 inch sewing pins--so very tiny! I love the cute little birds and the delicate petals of the flower--oh my!

I used the Wendy the Bird pattern I found from LollyChops for the main body and altered the wings. The blue fabric is a Robert Kaufmann fabric that I thought had a feather sort of look to it. Eyes are made with silver sequins and small black beads. The wings have blue hand stitching and rows of sequins for a little extra sparkle. They are made from felt, with the backs of each wing having wool felt. Perfect for holding needles!

I filled this one with poly-fil stuffing to avoid any possible conflicts with customs over things like walnut shells or shavings. This had the added benefit of being much lighter--always a plus for international shipping. I used a small stone inside on the bottom to help weight the bird down so it doesn't tip forward. The bird is big enough to fill my hand, so not too tiny of a pincushion.

I also sent three pin toppers created by Marla Sharp. They are on 1.5 inch sewing pins--so very tiny! I love the cute little birds and the delicate petals of the flower--oh my!

A fun little pincushion for my partner to enjoy--I hope she likes it!
Sunday, September 26, 2010
Halloween Fabric Postcards
I was invited to join a fabric postcard swap awhile back--and, having never heard of making fabric postcards, I just had to check it out--and then, of course, I just had to sign up for a round of the swap! (It's like that book If You Give a Mouse a Cookie.) I was intrigued over the idea and with the theme of Fall or Halloween, I thought it'd be a perfect chance to use some of those cute Halloween ideas I've seen, but never really gotten around to. I know back East, Halloween is a pretty big deal, but around here, not so much--guess we're just not that into trick-or-treating in the rain! LOL
The swap was three postcards, each one to a different partner. All three of my partners said either Fall or Halloween as a preference, so I went with Halloween for all three. I had a lot of fun trying out some ideas on these. Each one has a different front, but the backs are all simple muslin with a quick message to my partner and their address (which is why I won't be showing the backs). I would have loved to use some of my Halloween fabric on the back, but we were supposed to write on them, so prints were out.


The second postcard I created was the ghost. I used a patterned fabric for the background and appliqued the ghost body (another Gaye Shoell design) down with a bit of batting underneath so he's a little puffy. His eyes are French knots and the cheeks are colored with colored pencil and a few small embroidery stitches. The star and square are raw edge appliqued--the black square says "Boo!". I also sewed an pale orange mother-of-pearl button on for added dimension. He's a sweet little ghost.


The swap was three postcards, each one to a different partner. All three of my partners said either Fall or Halloween as a preference, so I went with Halloween for all three. I had a lot of fun trying out some ideas on these. Each one has a different front, but the backs are all simple muslin with a quick message to my partner and their address (which is why I won't be showing the backs). I would have loved to use some of my Halloween fabric on the back, but we were supposed to write on them, so prints were out.

All three have a border of varigated quilting thread and an interior of a very stiff heavy Pellon interfacing--no one wants a floppy postcard. I used adhesive photo spray instead of an iron-on as that was what I had on hand. It actually worked quite nicely and I definitely would use it again. I knew I'd be mailing them in an envelope rather than straight through the mail (wanted to keep them clean), so I had some fun with a couple of simple embellishments.
The first one I made was the pumpkin face. I found a goofy pumpkin in one of my mom's tole painting books by Gaye Shoell that was just to funny to pass up. His eyes, nose and tooth are appliqued. I sewed shell beads for the center of each eye. The rest of his face is hand embroidered. I did add a bit of blush to his cheeks with a colored pencil and a few black lines with a pen. Makes you smile, doesn't he?

The second postcard I created was the ghost. I used a patterned fabric for the background and appliqued the ghost body (another Gaye Shoell design) down with a bit of batting underneath so he's a little puffy. His eyes are French knots and the cheeks are colored with colored pencil and a few small embroidery stitches. The star and square are raw edge appliqued--the black square says "Boo!". I also sewed an pale orange mother-of-pearl button on for added dimension. He's a sweet little ghost.

For the last postcard, the little witch, I wanted to do something a little more detailed. She is from a vintage embroidery pattern. I raw-edge appliqued her hat and dress with a fun fabric that had holographic stars on it. The main coloring is with coloring pencil (ironed) and a black pen. Her broom straw, eyes and hat band are hand embroidered. I gave her red hair like me (okay, mine is not literally red like that). Who could be afraid of a cute little witch like this?

So, there you have it--probably, the only Halloween crafts I'll get to this year. I definitely had fun making these postcards. They are quick to make and I'm sure I'll make more in the future!
Friday, September 24, 2010
Monkeys, Elephants, and Babies--oh my!
So how do you decide what to give for a baby shower gift? Well, for me, I have a division of two main categories--bought and handmade. There are a lot of baby shower invites constantly coming through, but some people get lazy and cheap about it and just send out a mass email or mention it to you in the grocery store. Really? A new baby and that's it, a two line email sent to everyone in your address book? Hmm, I always think babies are more special than that. So for the lazy, I give lazy--I go buy something. Oh, don't worry, its something nice--never jip a new baby. But for those who actually bother to mail out an invitation to me, I make something. Quilts, toys, booties, who knows, but I make it. Sure it takes more time (and money), but obviously these moms are really into having a baby--so I put the effort in. I usually like to make a snugly blanket with flannel and minky. Mmm...
This time, for a baby boy, I decided to do something different--toys! I've been hearing all about how wonderful those crinkle toys are, so I just had to make some. I made two. First, a softie toy monkey. I used the Millie the Monkey pattern from Bit of Whimsy Dolls but added some crinkle to its body. I figure this toy will grow with the baby until he's much older.
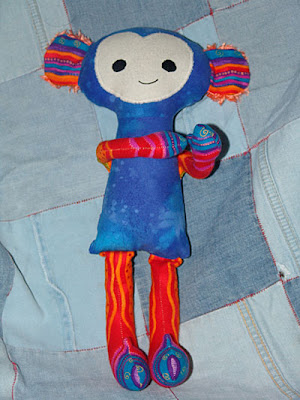

I used orange minky-type fabric for the backs of his ears for a little fun texture. I also embroidered a little heart on his bum!
I also made a flat crinkle toy; something that could be taken with the baby easily. To go with the monkey softie, I had some great jungle flannel and some fun orange plaid flannel. (I know, how perfect is that--and I didn't even preplan it!) I decided an elephant would be best, so after searching for a great shape for an elephant, I came across this adorable quiltie pal made by Kim Burley (quiltinkimmie). She, being a completely awesome person, let me use the shape for my elephant.
I lined the inside with cleaned wrappers from protein bars (my border collie loves the sound, so it must be good) and a cough drop bag. (I've also heard of moms using the wrappers from diaper wipes, but not being a mom, I didn't have a spare one on hand.) I also used a grosgrain orange polka dot ribbon for the tail which will also act as a loop for the plastic accessory ring so mom can attach it to the baby car seat or a pacifier or whatever.

You can see where I stitched the shape of an ear and top stitched around the edge of the elephant--this not only adds to the finished look, but also helps hold the inside wrappers in place. (His name is Peanuts.)


This time, for a baby boy, I decided to do something different--toys! I've been hearing all about how wonderful those crinkle toys are, so I just had to make some. I made two. First, a softie toy monkey. I used the Millie the Monkey pattern from Bit of Whimsy Dolls but added some crinkle to its body. I figure this toy will grow with the baby until he's much older.

Bright and cheery isn't he? (He's been renamed Charlie because I didn't think he looked like a Millie, BTW.) I used luscious flannels for this monkey so he's soft and cuddly. His face is hand embroidered (no buttons for babies!) and inside this monkey's tummy is some extra crinkle material (McDonald's coffee packet wrappers in this case) so that when Charlie is squeezed he sounds fun and crackling.

I also made a flat crinkle toy; something that could be taken with the baby easily. To go with the monkey softie, I had some great jungle flannel and some fun orange plaid flannel. (I know, how perfect is that--and I didn't even preplan it!) I decided an elephant would be best, so after searching for a great shape for an elephant, I came across this adorable quiltie pal made by Kim Burley (quiltinkimmie). She, being a completely awesome person, let me use the shape for my elephant.
I lined the inside with cleaned wrappers from protein bars (my border collie loves the sound, so it must be good) and a cough drop bag. (I've also heard of moms using the wrappers from diaper wipes, but not being a mom, I didn't have a spare one on hand.) I also used a grosgrain orange polka dot ribbon for the tail which will also act as a loop for the plastic accessory ring so mom can attach it to the baby car seat or a pacifier or whatever.

You can see where I stitched the shape of an ear and top stitched around the edge of the elephant--this not only adds to the finished look, but also helps hold the inside wrappers in place. (His name is Peanuts.)

Now all these cool toys need is a baby to scrunch them--but that's someone else's part! :) Enjoy your new home Charlie and Peanuts!

Subscribe to:
Posts (Atom)