Sorry to those following along for the long pause in blogging. I have been unemployed for a few months now looking for a job--no, still haven't found one--but, I do have a plan. I decided to give my Etsy shop another go!
I actually had opened one quite awhile ago and had a few things listed, but my job and life took up too much of my attention to really get things going properly. Now that some of that is out of the way, I've been working on getting things set up. I also talked my mom and sister into trying a few of their items too, so there'll be a bit more variety.
So, what's taking so long? Well, mainly the CPSIA details. The federal government has added a few new huge regulations for those making children's toys and products which complicate the berjeebers out of it all. (I know, I've been watching videos and reading documents until my eyes want to bleed from all the legal talk!) It also can make things very expensive unless you very carefully choose your toy components because everything has to meet the new lead and phthalate level requirements, as well as, the safety standards. That means expensive third party testing.
There are many things like fabric, thread, Velcro, wood, pearls, etc. that are exempted from testing because they've already proven that there's no lead (and not being plastic, obviously no phthalates) in them. BIG sigh of relief there! But things like plastic safety eyes, buttons, rhinestones, zippers, snaps, etc. all still need testing. Fortunately, for small batch makers like myself, we can use the General Conformity Certificate (GCC) of the component's company. Unfortunately, many manufacturers are simply avoiding testing by saying that their products aren't made specifically for 12 years or younger and so they won't test according to CPSIA requirements. This makes it a bit frustrating when you want to use something like say a plastic button or maybe a cool vintage glass button on a doll or something as simple as a sew-on snap. I think the least expensive lab I saw was charging around $45 for one particular lead level test. Add to that lead in surface coatings (such as paint on a wooden block) or phthalate totals (such as certain plastic parts) and you can see how costs start to rise. And, this is for each item. So, if you start seeing these items missing from handmade toys, don't be surprised. (Although, I know there are many handcrafters who are just ignoring it all.)
My solution is to separate my handcrafted creations into categories for children (3 to 12 years old) and the "adults" (older than 12 years). I will continue to make my heirloom and art dolls and creatures for those who are old enough to not put their buttons in their mouths, but I will also make "child safe" versions without untested items. So, for example, a doll dress might have Velcro or wooden or mother-of-pearl buttons for closures for the child's version while the heirloom version might have sew-on snaps and resin buttons instead. Animal type creatures will have felt or embroidered eyes instead of my usual button eyes (although I do embroider many of the heirloom/art faces too). So, for now, there will simply be some items not available in a child's version. As I get testing documentation in place, I can add these components to my child versions.
Don't worry, I have some lovely dolls and toys in the works for children---they'll never miss the rhinestones! For now though, I've revamped my shop look, designed labels and cards, drawn up new patterns and gathered my old ones, picked out fabrics and begun cutting away. Now, I'm just waiting for my CPSIA regulated woven labels and contact cards to arrive.
So, if you buy handmade toys (and I certainly hope you do), support those crafters who have gone to all the effort to meet the requirements of CPSIA---it really is a huge effort.
I hope you'll come visit my shop once I get some of my creations in there for you to see!
And now, I have a skirt to finally make...
Showing posts with label Crafts. Show all posts
Showing posts with label Crafts. Show all posts
Wednesday, July 17, 2013

Wednesday, October 24, 2012
Butterick 4226: Stars gets a new coat.
Last time I made Stars a coat with Butterick 4226, I made the version with the collar. This round I made it without so that it'd be reversible. Both layers are polar fleece with the main layer having an appliqued star and patch sewn to the back.
This time I used strips of velcro instead of two large pieces, this allows me to adjust the size better. The appliqued star is stitched with hand sewn blanket stitching and the patch is a military one found on ebay that says "Bring in the wolf". Kind of fits his personality, lol. The stitching took forever, but I like the effect. There's also blanket stitching up where the collar would be at the neckline and on the belly bands.
Stars had lots of fun running around being a superhero, defending the yard from cats, squirrels and the occasional jogger. He's very conscious of his duties to protect against the forces of evil.
As you can see, I skipped adding the binding and instead opted to sew the two main layers together (with the belly bands in place) pillowcase style and then turn right side out. The blanket stitching at the neck closes the whole thing off. As the layers are polar fleece, there's no worry about fraying.
B4226 is probably my TNT for Stars. You can cut both layers, including collar pieces, in less than 30 minutes and, if you skip the binding, you can have one sewn up in less than an hour. I have a few more already cut and ready for some much needed sewing time on Christmas gifts.
Stars loves this jacket--in fact, he gets very upset if you try to take it off of him! Which incidentally is why you do not see photos of the reverse side, a lovely, bright multi-star print. Oh well.
 |
| Side view with the main side out. You can see the top stitching for the velcro strips. |
 |
| Fuzzy shot, taken while chasing down a border collie with a camera...not the easiest task! |
 |
| Okay, a better view. Very superhero of him. |
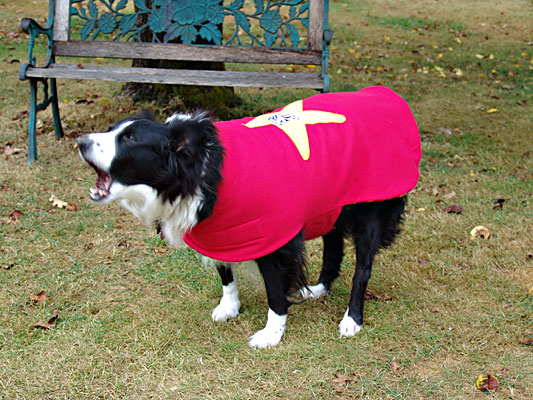 |
| Stars giving his super bark. Yes, in his mind there's him, Bolt and Superman. In that order. |
 |
| You can sort of see how the both the shoulder and belly bands wrap nicely around without getting in the way for movement or potty times. |
 |
| Using velcro instead of snaps or buttons, not only makes it much easier to put on and fit snuggly, but Stars can also lay in it without any uncomfortable bumps. By the way, this is the look he gives me when he's had enough of holding still and playing model. |
Stars loves this jacket--in fact, he gets very upset if you try to take it off of him! Which incidentally is why you do not see photos of the reverse side, a lovely, bright multi-star print. Oh well.
 |
| Did I see a squirrel? |

Saturday, October 20, 2012
Personalized Sewing Drawers
I am a big fan of personalizing one's space, maybe that comes from having the name Shayla which could never be found anywhere as a kid or maybe it comes from being squished in a small room with two sisters and zero personal space, anyway I love remaking things or just creating something new that represents me, especially for my sewing area.
Do you remember when I showed you this lucky thrift store find?

Turned out to be an Ikea drawer box, which sadly, they do not make anymore, and was just dying to be turned from bland into beautiful. So after a bit of searching for some public domain designs, I found a bunch of fabulous children's book illustrations in primers and poem books from before 1922 (at least) to use. Lucky me, I have a sister who is uber-talented at pyrography (wood burning) and traded her a vintage Singer sewing machine (her first real sewing machine, no, the toy one from childhood doesn't count... sniff, I'm so proud) in a sewing cabinet for some artwork.
Now check out my thrift store box...
Gorgeous isn't it?! And it is one of a kind! I have two little wood boxes with children's book illustrations on them already, so I decided to stick with the theme--I just adore antique children's books.
Here's some closer views of the drawers:
When you consider that each drawer is only around three inches high, that's some crazy amount of detailing. I tried to get images from similar time eras so that they would sort of coordinate.
I also found larger images for the sides and top. Here are the two sides:


Do you remember when I showed you this lucky thrift store find?

Turned out to be an Ikea drawer box, which sadly, they do not make anymore, and was just dying to be turned from bland into beautiful. So after a bit of searching for some public domain designs, I found a bunch of fabulous children's book illustrations in primers and poem books from before 1922 (at least) to use. Lucky me, I have a sister who is uber-talented at pyrography (wood burning) and traded her a vintage Singer sewing machine (her first real sewing machine, no, the toy one from childhood doesn't count... sniff, I'm so proud) in a sewing cabinet for some artwork.
Now check out my thrift store box...
 |
| You can see the natural color variations that come from the different bits of wood used when creating the box. I love that little bit of quirkiness that wood has! |
Here's some closer views of the drawers:
 |
| Upper left drawer--currently holding my snaps, grommets, and hooks & eyes. |
 |
| Upper middle drawer--currently holding doll/animal safety eyes and my sewing machine light bulbs which I always manage to misplace. |
 |
| Upper right drawer--currently holding velcro. |
 |
| Middle left drawer--currently holding my elastic, well some of it anyways. |
 |
| Middle right drawer--currently holding my embroidery floss. |
 |
| Bottom drawer--this one holds all my zippers, now they won't get bent! |
I also found larger images for the sides and top. Here are the two sides:
 |
| This is me telling Stars, "You musn't keep running through my tulips!" |
 |
| I just love this image of the little girl wading. I wonder what she's looking for? |
 |
| You can see how much little detail work there was on this one! |
And the top:
 |
| I love swinging, so how could I resist this adorable image! |
She also signed the bottom with a lovely little note.

I really think I got the better end of this trade. My little thrift find is now an heirloom! Have fun personalizing your sewing space!

Saturday, June 30, 2012
Hexagon Magnet Madness
Finally, finished and shipped! My RATZ Swap magnets that is. I think I greatly overestimated my handsewing speed, haha! But I really wanted to give tiny hexagons a try after seeing this sample by Susan (chickenfoot) that just amazed me. I mean 3/8 inch hexagons are pretty teenie tiny and they look so cute there in her hand. (Note to self: teenie tiny cuteness equals double the work of simple cuteness.)
So as I was stalking my partner, I happened to see that not only does she love hexagons, almost to the point of obsession, but she also had this adorable sample of more teenie tiny cuteness marked in her favorites---and so did I! It was meant to be. Plus afterstalking researching my partner, I discovered that she is a really amazing woman with a huge heart of gold, so I figured I'd make her something special (I know, I know. I end up doing this on all my swaps, why? Simply because I keep getting the most amazing, inspiring swap partners! Really. I think my swap mamas give me their best ones. Ones with backstories that just floor me and make me want to go to the ninth in creating something.)
Well, the description said 1/4 inch hexagons, so I printed some up and started in on cutting. Hmm, these were looking kind of tiny, but I needed tiny, I was making magnets. So, I pulled out my less-than-an-inch-size bag of scraps and started pulling colors for flowers and butterflies. Then I went about basting and sewing hexagons as usual to make the shapes. Really, not too bad. A bit hand cramping and blinding to sew such little buggers, but the first flower done really got me going. Here's a tip: have really good lighting, especially when stitching black to black with black thread, lol!
I backed each with a color matching piece of eco felt (I didn't know if she was allergic to wool, so I didn't use wool felt--but you could) cut in the overall shape (note to self: in the future cut the felt just a teensy bit larger than the piece so that it's easier to stitch) and blanket stitched it with two strands from a six-strand cotton floss (I like DMC, but use what you can find.) I also stuffed the butterfly just a bit to make it a little more interesting. I used E6000 to glue button sized magnets to the back of the felt prior to stitching the felt to the fronts so that the backing piece could lay flat while drying.
What do you think? Kind of some teeny tiny cuteness going on there, isn't it?!
Edited 7/3/12: Okay, now that my partner has received these, I can tell you who she is. My partner this round was Caryn (Caryn211) from Nebraska. She loved them and left me a very nice compliment on my Flickr posting of this picture, totally made my day. If you want to know how really special this woman is, just read this article that I found when I was snooping around to get ideas. Like I said, I just keep getting the most amazing and inspiring women as partners for swaps.
So as I was stalking my partner, I happened to see that not only does she love hexagons, almost to the point of obsession, but she also had this adorable sample of more teenie tiny cuteness marked in her favorites---and so did I! It was meant to be. Plus after
Well, the description said 1/4 inch hexagons, so I printed some up and started in on cutting. Hmm, these were looking kind of tiny, but I needed tiny, I was making magnets. So, I pulled out my less-than-an-inch-size bag of scraps and started pulling colors for flowers and butterflies. Then I went about basting and sewing hexagons as usual to make the shapes. Really, not too bad. A bit hand cramping and blinding to sew such little buggers, but the first flower done really got me going. Here's a tip: have really good lighting, especially when stitching black to black with black thread, lol!
 |
| Aren't they adorable?! Am I totally crazy now--because I want to use up the rest of super tiny scraps this way! |
I backed each with a color matching piece of eco felt (I didn't know if she was allergic to wool, so I didn't use wool felt--but you could) cut in the overall shape (note to self: in the future cut the felt just a teensy bit larger than the piece so that it's easier to stitch) and blanket stitched it with two strands from a six-strand cotton floss (I like DMC, but use what you can find.) I also stuffed the butterfly just a bit to make it a little more interesting. I used E6000 to glue button sized magnets to the back of the felt prior to stitching the felt to the fronts so that the backing piece could lay flat while drying.
What do you think? Kind of some teeny tiny cuteness going on there, isn't it?!
Edited 7/3/12: Okay, now that my partner has received these, I can tell you who she is. My partner this round was Caryn (Caryn211) from Nebraska. She loved them and left me a very nice compliment on my Flickr posting of this picture, totally made my day. If you want to know how really special this woman is, just read this article that I found when I was snooping around to get ideas. Like I said, I just keep getting the most amazing and inspiring women as partners for swaps.
Saturday, June 9, 2012
RATZ Swap--Key Fob
I received my key fob from the RATZ swap earlier this month (hey, it's only day 9). My little fob came all the way from across the ocean in Norway! That's a long way to travel!
Made for me by Synnoeve (Synnovekri), this key fob is full of hand crafted goodness.
This is a really cool style that is starting to show up here and there. (I think a lot of it started from the Japanese craft books on the market these days.) The keys actually hook to a clip that's hidden inside the key fob. The clip pulls down through the bottom to use the keys, but then for the rest of the time you pull the wrist loop on the top and the keys are pulled up inside--no rattling around when walking or scratching up phone screens in a purse. So simple, and yet, genius!
The reverse side is a liberated or wonky log cabin in black and white and red fabrics. (And we all know how I love me some black and white fabric!) There's also a small metal charm tag that says "Handmade" near the bottom, a very clever touch! You can see the hand crocheted wrist loop cord with the adorable little fish and bell at the end. She didn't even know how much I like the sound of little bells, coolness!
The front side is just plain gorgeous! A hand embroidered butterfly and floral design are front and center in multi-colored floss. Her stitching is, by the way, impeccable. There's also a little red heart button, so cute! And, as if all that weren't enough work put into one little key fob...there's hand crocheted lace edging along the bottom! I can't crochet worth a thing, believe me, but I love crocheted lace, so this was just icing on the cake.
Synnoeve really nailed this--embroidery, crocheted lace, little bell to hear when I walk, butterflies--she's either slightly psychic or a very good "stalker" of swap partners. Hmm...
No more stuffing my keys into pockets creating unsightly bulges, nope! Now, they will dangle from my wrist in style!
Made for me by Synnoeve (Synnovekri), this key fob is full of hand crafted goodness.
 |
We weren't supposed to include extras, but the fabric and ribbon were what she "wrapped" it in, sneaky girl!
|
This is a really cool style that is starting to show up here and there. (I think a lot of it started from the Japanese craft books on the market these days.) The keys actually hook to a clip that's hidden inside the key fob. The clip pulls down through the bottom to use the keys, but then for the rest of the time you pull the wrist loop on the top and the keys are pulled up inside--no rattling around when walking or scratching up phone screens in a purse. So simple, and yet, genius!
The reverse side is a liberated or wonky log cabin in black and white and red fabrics. (And we all know how I love me some black and white fabric!) There's also a small metal charm tag that says "Handmade" near the bottom, a very clever touch! You can see the hand crocheted wrist loop cord with the adorable little fish and bell at the end. She didn't even know how much I like the sound of little bells, coolness!
 |
I love that the log cabin block is angled and wonky. Also, the use of the bits of linen colored fabric in with the black and white really makes this dynamic and pulls in the crocheted lace edging and cord.
|
The front side is just plain gorgeous! A hand embroidered butterfly and floral design are front and center in multi-colored floss. Her stitching is, by the way, impeccable. There's also a little red heart button, so cute! And, as if all that weren't enough work put into one little key fob...there's hand crocheted lace edging along the bottom! I can't crochet worth a thing, believe me, but I love crocheted lace, so this was just icing on the cake.
 |
A linen fabric makes the perfect background to show off some lovely embroidery work!
|
Synnoeve really nailed this--embroidery, crocheted lace, little bell to hear when I walk, butterflies--she's either slightly psychic or a very good "stalker" of swap partners. Hmm...
No more stuffing my keys into pockets creating unsightly bulges, nope! Now, they will dangle from my wrist in style!
Friday, May 25, 2012
RATZ Swap Round 1--Key Fob
I've really enjoyed Round 1 of the Rapid And Tiny Zakka Swap (also known as RATZ). The idea behind this swap (invented by the crazy gals running the Doll Quilt Swap) was that it would be fun to have some swaps of various items that weren't quite as involved as a doll quilt. Something that didn't cost much to send and could be whipped up in month's time on a busy schedule. Let us try out all those cool crafty items seen on blogs. I think RATZ definitely accomplishes that.
Our first round was for key fobs. I haven't received mine yet--of course, we have until the last day of the month to mail out--but I'm sure I'll love it. I've enjoyed seeing all the cool creations so far. I'm pretty excited about what I made my partner too! My partner's a secret for now, but I can show you what I made. Here it is:
I can't recall having made a zippered pouch before, so I think this is my first (although not my first zipper installation). It was pretty easy. I mostly followed the tutorial found on Noodlehead for construction information, with some changes in size, loop construction, front design and materials. Mine is approximately 3 7/8 inches by 5 1/4 inches after starting with pieces of 4.25 inches x 6 inches (not counting the loop and hardware).
The hardware is heavy duty, so I don't have to worry that my partner will stick a phone in there and it'll snap and break the phone. The clip also swivels so as my partner carries it around it will move with her. Also, the clip is easy to open and close, but not flimsy. The zipper is a YKK white 5 inch zipper purchased from ZipIt, an Etsy seller with a great reputation and excellant customer service. I also used some Pellon 987F which is a fusible fleece (you can usually find some at stores like JoAnns and online) to interline both sides and the key loop to give some sturdiness and padding.
For the interior lining, I used a Kona solid--Bahama Blue, I think, but could be Robin's Egg. The exterior is all from the Millie's Closet line (I'm currently in love with this fabric.) with a solid back and a pieced front. I did just a bit of quilting for decorative purposes--it's not that big of a pouch to be worried about batting stability (and I used fusible anyway).
The front uses the hand embroidered piece that I made using a vintage embroidery pattern and DMC embroidery floss. The outer edges are strips taken from the same Designer cloth (also called cheater quilt cloth) from the Millie's Closet line. One thing I like about this particular type of fabric is that it has large squares of lots of fabric designs, so, for tiny projects, you can get a wide variety of "fabrics" from one fat quarter!
I really hope my partner will like this! If you haven't made a little zippered pouch before, try it! (There are lots of tutorials and patterns online, I liked the free one at Noodlehead mentioned earlier, but you could even make up your own.) They're easier than they look, make a great little key chain attachment (think of those summer garage sales you can go to without that big clunky tote), and once you get used to the zipper installation you'll be whippin' these babies out for gifts.
Our first round was for key fobs. I haven't received mine yet--of course, we have until the last day of the month to mail out--but I'm sure I'll love it. I've enjoyed seeing all the cool creations so far. I'm pretty excited about what I made my partner too! My partner's a secret for now, but I can show you what I made. Here it is:
 |
| See--there's the little embroidery I showed earlier this month! |
I can't recall having made a zippered pouch before, so I think this is my first (although not my first zipper installation). It was pretty easy. I mostly followed the tutorial found on Noodlehead for construction information, with some changes in size, loop construction, front design and materials. Mine is approximately 3 7/8 inches by 5 1/4 inches after starting with pieces of 4.25 inches x 6 inches (not counting the loop and hardware).
The hardware is heavy duty, so I don't have to worry that my partner will stick a phone in there and it'll snap and break the phone. The clip also swivels so as my partner carries it around it will move with her. Also, the clip is easy to open and close, but not flimsy. The zipper is a YKK white 5 inch zipper purchased from ZipIt, an Etsy seller with a great reputation and excellant customer service. I also used some Pellon 987F which is a fusible fleece (you can usually find some at stores like JoAnns and online) to interline both sides and the key loop to give some sturdiness and padding.
 |
| Here's a bit of a peek at the lined inside, check out that beautifully installed zipper! |
 |
| Back exterior is a piece from Millie's Closet: blue/red/aqua color way, Designer cloth. |
 |
| The "smudge" under the eye is actually the thread knot on the other side--isn't visible in real life, just under bright camera flash. Figures, LOL! For those just learning embroidery, I used the outline or stem stitch. |
Sunday, May 13, 2012
Sneaky Peek for RATZ Swap
Here's a quick look at what I'm making for my secret partner in the Rapid And Tiny Zakka Swap (RATZ). I finished up the hand embroidery for one side of the little zipper pouch I'm making.


This cute little vintage pattern was found at the Hoop Love Vintage Transfers group over on Flickr. (If you love vintage embroidery like I do, then you really must join the group--they have one of the largest collections of patterns I've found anywhere!)
Just waiting for my zippers to arrive. After hearing all the rave reviews about Zip It on Etsy, I decided to give them a try. (Review to follow.) I'll be putting the front and back and lining of the pouch together so they're all ready to go once the zipper arrives. I'm following the tutorial found here on Noodlehead, although I may make an adjustment in size, we'll see.
Now, I'm going to go eat some pancakes and enjoy this gorgeous sunny Mother's Day---Happy Mother's Day to all you beautiful, talented ladies out there making the world a better place!
Thursday, May 19, 2011
Pay It Forward
Ever seen this icon before? Well about a year ago, I did on another crafter's blog. The idea behind it is that you receive a handmade item and in exchange, you commit to creating and sending three handmade items out within one year. It can be whatever you want to make and send. Spreadin' the crafty love. Sounds pretty cool, doesn't it?
Well, I'd just about forgotten that I had signed up to be a receiver--that's a long time ago! Then the other day a white envelope from Norway arrives. Marit, owner of the Quilt It blog, had sent her round of the Pay It Forward. Such a fun unexpected surprise! Here is the lovely handmade item she created and sent to me--a wonky star mug rug! How lovely--such beautiful craftsmanship and fabrics!

So now it is my turn--I've got 365 days to make and send out some crafty goodness to three people somewhere in the world. If you would like to be one of the Pay It Forward receivers, just leave a comment. I'll choose three. Be sure and leave me an email to contact you with so that I can get your address! Remember, if chosen, you are committing to send out three handmade items to three people once you receive mine sometime in the next year. If you know anyone else who might be interested, please feel free to let them know.
Hmm, now what to make...
Subscribe to:
Posts (Atom)