Showing posts with label challenge. Show all posts

Saturday, May 4, 2013

The Great British Sewing Bee--And a Sew Along!

Recently, some of us in the United States have been introduced to a BBC show called The Great British Sewing Bee.  I love the focus on sewing from an amateur contestant viewpoint.  (Also, the lack of snarky behavior from both participants and judges is refreshing after Project Runway.)  The show only has eight contestants and four episodes, so not a huge time commitment, but lots of fun to watch.  (And, let's be honest...using a fun British accent makes everything more interesting.)

Fortunately, some very thoughtful individuals have put the episodes on YouTube for the rest of us to watch.  (Warning:  The last two episodes have those annoying commercials in them.  Hopefully ones without them will be uploaded soon.)

Episode 1
Episode 2
Episode 3
Episode 4

After watching, I got to thinking.  I've always wanted to try a sew along to Project Runway, but so often their challenges don't really fit into a practical everyday sewist's life.  I mean, really, do I want a dress from the hardware store or men's stripper pants.  Nope.  No way.  But...with this show, the challenges are practical, doable, and can be done within budget.  And I can stand watching the episodes again to get details and inspiration. 

Thus, I've decided to have my very own The Great British Sewing Bee Sew Along, or The GBSB Sew Along.  I'll be taking each challenge in order but adding more time to allow for things like actually fitting the patterns to myself or a victim volunteer model (aka sisters, cousins, etc.), finding the needed clothing for alteration challenges and real life jobs.  I'm also going to try and only use from my stash, but I may need to get notions, linings, or a particular challenge fabric.  It'll definitely push me outside of my comfort zone (fly front trousers, gulp).  You can start any time, so if you're reading this a month from now, don't be shy about joining in the fun! 

Anyone want to join me?


If you do, be sure and join our Flickr group to show off your project photos, and don't forget to grab the button over there on the sidebar.


The Great British Sewing Bee--And a Sew Along!SocialTwist Tell-a-Friend

Sunday, November 7, 2010

Marvin the Elephant

I've been sick lately, hence the lack of blogging.  But, I didn't want you to miss what I've been up to, so the next few entries will be for catching up on projects and swaps from October and November.  I also have some new block patterns and a blanket tutorial coming up for you to enjoy.

I recently purchased a new toy pattern, Simplicity 2613, to try out.  I loved it.  It was so quick and easy--perfect for last minute gifts!  JoAnn's was having their typical pattern sale for $1 and this was one of the ones I picked up, so worth it.  I'd recommend everyone have this one in their stash.  My full review is over on Pattern Review, but here are just a couple of quick photos of the elephant I made using some vintage cheater cloth fabric sent to me by a friend.


He's been named Marvin and has black plastic safety eyes (very easy to install), vintage fabric body and a navy blue grosgrain ribbon.  Marvin is the perfect size for hugging and carrying around.  My sister loves him, so Marvin ended up with her as part of her birthday present (hey, you're never too old for an adorable lovie).


I plan on trying the giraffe from the pattern next with some more vintage fabric from my stash.  The cost of Marvin was 1.50 because I was given the fabric, stuffing and ribbon, so I only purchased the eyes (.99 for two sets) and pattern (.99 on sale).  He's only around 13-14 inches tall, so this softie really doesn't take much for stuffing and fabric supplies, most of you could probably make him out of your stash.  Marvin would also be super cuddly made from a minky fabric.
Marvin the ElephantSocialTwist Tell-a-Friend

Friday, September 24, 2010

Monkeys, Elephants, and Babies--oh my!

So how do you decide what to give for a baby shower gift?  Well, for me, I have a division of two main categories--bought and handmade.  There are a lot of baby shower invites constantly coming through, but some people get lazy and cheap about it and just send out a mass email or mention it to you in the grocery store.  Really?  A new baby and that's it, a two line email sent to everyone in your address book?  Hmm, I always think babies are more special than that.  So for the lazy, I give lazy--I go buy something.  Oh, don't worry, its something nice--never jip a new baby.  But for those who actually bother to mail out an invitation to me, I make something.  Quilts, toys, booties, who knows, but I make it.  Sure it takes more time (and money), but obviously these moms are really into having a baby--so I put the effort in.  I usually like to make a snugly blanket with flannel and minky.  Mmm...

This time, for a baby boy, I decided to do something different--toys!  I've been hearing all about how wonderful those crinkle toys are, so I just had to make some.  I made two.  First, a softie toy monkey.  I used the Millie the Monkey pattern from Bit of Whimsy Dolls but added some crinkle to its body.  I figure this toy will grow with the baby until he's much older.


Bright and cheery isn't he?  (He's been renamed Charlie because I didn't think he looked like a Millie, BTW.)  I used luscious flannels for this monkey so he's soft and cuddly.  His face is hand embroidered (no buttons for babies!) and inside this monkey's tummy is some extra crinkle material (McDonald's coffee packet wrappers in this case) so that when Charlie is squeezed he sounds fun and crackling.


I used orange minky-type fabric for the backs of his ears for a little fun texture.  I also embroidered a little heart on his bum!
I also made a flat crinkle toy; something that could be taken with the baby easily.  To go with the monkey softie, I had some great jungle flannel and some fun orange plaid flannel.  (I know, how perfect is that--and I didn't even preplan it!)  I decided an elephant would be best, so after searching for a great shape for an elephant, I came across this adorable quiltie pal made by Kim Burley (quiltinkimmie).  She, being a completely awesome person, let me use the shape for my elephant. 

I lined the inside with cleaned wrappers from protein bars (my border collie loves the sound, so it must be good) and a cough drop bag.  (I've also heard of moms using the wrappers from diaper wipes, but not being a mom, I didn't have a spare one on hand.)  I also used a grosgrain orange polka dot ribbon for the tail which will also act as a loop for the plastic accessory ring so mom can attach it to the baby car seat or a pacifier or whatever.


You can see where I stitched the shape of an ear and top stitched around the edge of the elephant--this not only adds to the finished look, but also helps hold the inside wrappers in place.  (His name is Peanuts.)


Now all these cool toys need is a baby to scrunch them--but that's someone else's part!  :)  Enjoy your new home Charlie and Peanuts!


Monkeys, Elephants, and Babies--oh my!SocialTwist Tell-a-Friend

Saturday, September 18, 2010

Sunset Quilt

I just realized that I never posted about my sunset quilt!  Oops! 

I chose to do the landscape theme in the last swap for S.T.U.D. (Swap Til You Drop).  This was my first landscape quilt--and the only applique I'd done was the basket on the Wizard of Oz Toto quilt.  I did practice a little machine applique first making four pink bunny blocks, just to build up my comfort level first.  At the suggestion of some of the Flickr members, I quilted at the same time as I did the machine applique so that the shapes showed on the back like a drawing.  I'm still not 100% sure I like that look, but it is an interesting effect and I'm glad I tried it.

Here's a look at the back:


I used decorative stitching for the machine applique for a little added texture to the piece (and way more fun then just plain zigzag stitching).   For the label, I made a little house shape and instead of putting the label in a corner, I put the "house" into the scene.  The purple border is the actual binding.  I know, you're wondering what the binding is doing on the back--its called a knife-edge binding.  This is a sneaky way of putting a binding on without it showing on the front at all--think of a gallery wrap canvas print.  Perfect for art quilts.

Here's the goodies I sent with the quilt:


My partner, Andrea (quiltedoma), is a cat person (no one's perfect), so I included a cat pattern called Nana's Pretties and a piece of cat Laurel Burch fabric.  I literally had one little piece of cat fabric in my entire stash--maybe I should have sent some dog fabric instead for a little chaos in her sewing room, lol!  I also sent some fabric with dots for her dot fabric drawer.  (This woman has a fabric stash that makes me drool--think small fabric store!)  I also included some goofy lighthouse/seashore fabric, because, afterall, it is a landscape theme.  There's also a bag of tiny beads for use in quilt embellishments, some vintage rose piping, a cooling neck wrap (New York was having really hot weather at the time) and one of my reproduction hankie dolls.  There's also a bag of herbal tea which is my own blend of lavendar mint.  I also included a print out of the paper pieced pattern for a block I made in the Bee White Black group that Andrea loved so much--now she can make one too!

Alright, enough stalling!  The front of my sunset quilt:


I wanted something vibrant and just a little artsy.  I think I accomplished it.  I did not have a pattern, just an idea in my head and I cut it out as I went.  The quilt is pretty close to what I was envisioning, so I'm quite happy with the results.  I love that there is no binding showing so it is more like an art canvas.  This is made entirely with fabrics from my stash and scrap bin, so I also followed my "no buying" rule (self-imposed until I finish all signed up swaps through November).  It was fun to try something new--and everyone here who saw this little quilt fell in love, so I may have to make another one sometime!
Sunset QuiltSocialTwist Tell-a-Friend

Friday, September 10, 2010

Doll Quilt Swap 9--Finished! (Big Sigh)

After all the planning, the fusing, the cutting, the placing, the applique, the fussing and stressing---it's finished!  The lovely quilt I created for my secret partner for the Doll Quilt Swap 9 has been carefully packaged in its Priority Mail tube and shipped off to its new home (wipes tear from eye) along with some extra goodness.  What did I include in the package?  Well, hopefully it's all stuff my partner will like (otherwise I'll feel bad that I spent the extra on postage instead of eating the vanilla Goldfish crackers like I was tempted to do).  I included some metal embellishments (one says "cherish" and the other "love"), a pin cushion, pin toppers, a mug rug and before mentioned vanilla Goldfish crackers, which, btw, if you haven't tried you absolutely must.  Really, I mean it.  Go, right now and get some--then come back and finish view the world's most awesome quiltie.  (Don't worry, I'll wait.)


Well you don't really need a closer look at the Goldfish crackers, just try some (and get the chocolate ones too while you're at it).  But here's the little pincushion I made.  One point didn't line up right, argh!  Otherwise, a perfectly cute little 4 inch pincushion made with some Hoffman Meadow Dance fabric (my partner loves green) and some Kona Coal, another partner fav.  I found the most perfect matching button in my vintage button collection--doesn't it look like Kona Ash and Coal!  And while I am often loathe to part with my buttons (it's an obsession really), it was just too perfectly coordinated with the pincushion and quilt to not use it.


Here's the pretty back--some of the Westminster Fibers fabric that I used on the quilt back.  (Won from Bearpaw in a blog giveaway!  That fabric has been from New York to the UK to Oregon and now back to the East coast.  The fabric is more traveled than I am!)  Another vintage button--the photo really doesn't show the color right it's actually closer to the fabric pink in color.  I'll tell you, sewing those buttons on so that the center indented was a big pain in the neck, but the results are worth it.


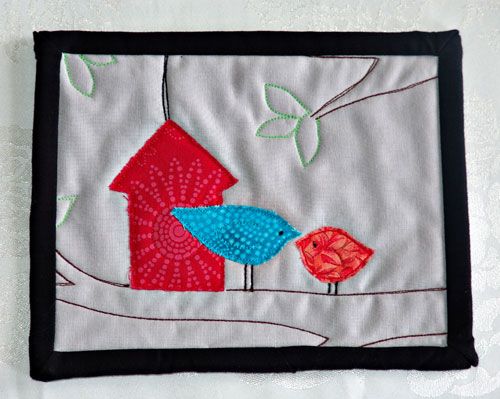
My partner, without knowing that she was my partner, mentioned that she was so busy that she'd regrettably had to turn down being in the Scrappy Mug Rug Swap.  (Horrors!)  We can't have a sad little mug with no rug (hmm, that sounds a bit Dr. Seuss-ish).  So, of course, being the completely sneaky partner I am--I made her one.  And, of course, I matched it to her quilt.  I did use different fabrics for the birds just so it wasn't totally the same.  I did a little free-motion drawing with the thread to make branches and leaves (some got cut off when the binding was added, but I like the effect.


Here's the back.  You can see how the applique stitching and thread drawing create the picture on the back. 


I needed to come up with something else that was fun to add to the goodie pile and then I saw pin toppers.  Adorable customized sewing pins with cute things at the top--like the old hat pin toppers, only much, much smaller.  I traded one of my sisters some seamstress work for her to create me some to give to my partner.  Sure, I could  make these, but why--she's already a genius talent with fimo clay (she makes miniature dragons and such), so why not let the expert do it.  Of course, she could not find her little tools, packed away somewhere, but being the artist that she is she adapted with a straight edge razor and a bamboo skewer.  (What can I say, the girl's got skills.)  My sis took a look at the quilt and then made these three pin toppers--how cool is that?!  These are made using glass head sewing pins that are only 1.5 inches long--we're talkin' uber tiny toppers!  Note the pearlescent nature of the toppers, so fabulous!


And now, what you've all been waiting for...drumroll please...  may I present... Leafy Treetops, my Doll Quilt Swap 9 creation!  (And the crowd goes wild!  Okay, so there's no crowd.  If there was a crowd though, it would be going wild right now.)

Just for a quick recap on fabric:  the background is Kona Ash, tree is Kona Coal and binding is Kona Black.   Sorry, I have no idea what the fabrics for the birds and house are, the selvedge is long gone.  I appliqued the edge and echo quilted the entire thing (took forever, but with these results, I can say it was definitely worth it) using Sulky premium 40 wt. rayon thread in Light Silver (number 1236) for the top and a Mettler thread (color 623) on the back which blended perfectly with the Kona Coal.  The rayon added a little sheen which glints here and there as the light hits it which I love.  This combo also quilted beautifully without any problems.

Where'd I get the name?  From a children's song that I learned as a small child (luckily, you don't have to hear me sing it)  that goes "In the leafy treetops, the birds sing good morning.  They're first to see the sun.  They must tell everyone!  In the leafy treetops, the birds sing good morning."

Some of you have asked if I drew the design.  Sadly, no.  My drawing skills are fairly limited unless you're talking drafting or perspective or a garden landscape plan.  It would take me far to long to draw this tree.  I used three different vector images which I combined and altered to get what I wanted.  You can find these kinds of images by going to websites that sell royalty free stock images (such as istockphotos or fotolia or shutterstock) or you might find some by Google searches.  Just be sure and get permission if its from a private source and follow all copyright laws.


Check out that quilting!  This was not done free-motion despite the appearance.  (I so wish my free-motion quilting was that good.  Nope, I'm at the same skill level as kindergarteners doing division.  So sad.)  I used my applique foot and meticulously (and slowly) went around and around and around.  So, see!  You don't have to have advanced quilting skills to get great results on a project.  Just be willing to put the necessary time in and you can have something wonderful!  Then, keep working on those skills.


My younger sister thought the lines reminded her of those Japanese sand gardens with the rocks--you know that have the lines rippling outward from each rock.  Yeah, now you're feelin' the Zen.  Okay, last quilting shot.


And finally, the back of the back of this quilt.  I love the texture the quilting created on the back.  It reminds me of those antique whole cloth quilts--except those where completely hand stitched which is a completely other level of skill that still amazes me.  Guess I'd be more accomplished if I'd turn off the tv and stay off Flickr...not happening.


I know you've all been wondering who got this little work of insane art.   The big reveal:  Dolores Goodson, also known as DeeRoo G!  Yep, this little quiltie has traveled completely across the country to Lovetsville, Virginia.  I thought the little snails were cute--and fitting as I took so long to make this.  They're from a vintage embroidery pattern that I colored in with colored pencils and then outlined with a Pima pen.


One last look at the quilt before I move on to the next project.  Sigh.  I'm really pleased with how it turned out.  Enjoy your new home Leafy Treetops!


Update (I thought you all would enjoy reading my partner's emailed response too):

I'm feeling faint.....I mean....I have no words! Hold on...some are coming to me....OH MY FREAKING GOSH!!! Shayla...I am tearing up here while I type this....wait...let me get a tissue. Sniff.

Ok...I'm composed. I really,really don't know how to express how much this means to me. This is definitely going into the livingroom WHEREVER I live!! You lady are a truely talented person....Counting the ways....

1. Colors, perfection
2. Stitching, amazing
3. Subject, spot on
4. Continution of the theme...mug rug, mini pins...brilliant
5. Pincushion...in green and grey...my too favorite colors...guess I'm an open book that you read perfectly!!;)
6. I LOVE goldfish!
7. The label, another mini piece of art
8. The back, splendiferous
9. Fabrics, Now that's what I'm talking about!
10. Bragging rights....you got them and I'm going to continue them!!!

Yep....time to get another tissue....now my husband seriously has to get our house finished so I can put this in a place of honor....ALWAYS!

Thank you sooooo much Shayla....I'm even keeping the card!

xoxoxo dolores
ps...I'm going to blog about this and use my 10 ways of loving this package!;)
Doll Quilt Swap 9--Finished! (Big Sigh)SocialTwist Tell-a-Friend

Wednesday, July 28, 2010

Charming Mini Quilt Sent

Whew, a few moments to give a quick update in between everything else.  The miniature quilt I sent for the Charming Mini Quilt swap arrived at its new home, so I can show it now.

This quilt went to momcindy (Cindy R.) in Colorado.  Cindy sent a fat quarter of a white tone-on-tone with her 30 charm squares.  The fabric was a lovely Christmas fabric in deep reds, greens, creams and black.  It really wasn't overly Christmas-y so that made it quite easy to work with.

Cindy is this really amazing woman that I wish you could all get to know.  In October, Cindy will have reached her first year of being cancer free after undergoing some major treatment for bladder and uterine cancer--yay, Cindy!  She was a nurse and then became a lawyer who represents abused children in court.  Cindy also has a lovely 7-year old adopted daughter--and, as if she doesn't already sound like a saint--she's been married for 20 years to the same sweetie!  (I just hope I'm not standing behind her on judgement day.  Really, how would anyone look good following that kind of woman!)

For Cindy I chose to make a quilt with the block known as "Morning Star".  Why?  The Morning Star is also known as the Evening Star.  In reality, its a planet--Venus, which was named for a personage that represented love and beauty.  This "star" shows brightest as the long darkness of night begins, shines through the night and then brightens again as the new day dawns.  Can you think of a better symbol for someone like Cindy? 


I paper pieced the center to get all those points just right.  The border was rotary cut.  I added from my stash a tiny bit of white tone-on-tone to the outer row of points as it ended up taking a bit more than a fat quater for all the white areas, something to note if you decide to make one of these yourself.  The dark green border was from my stash--it worked so perfectly with Cindy's charm squares.


Because so much of the quilt was made up of these lovely points into a star, I decided to use the stitch-in-the-ditch method for quilting.  I sewed in the seam along all the points, corners and border.  Yes, it was a bit tedious to do that, but the effect was great and the star pattern then showed on the back.  Here's some closer looks at the quilting which was done in white.


The backing fabric I found at Craft Warehouse here in Oregon and it was just perfect.  Not only were the colors spot on, but all the words were so fitting for Cindy and her life.


In lieu of the typical box of goodies sent along with a mini quilt, I made Cindy's daughter a doll quilt of her own.  Her favorite colors are purple, blue and green.  I kept the quilting light so that the little quilt wouldn't be too stiff  if she wanted to play with it.  All the fabric was in my stash, including the vintage fabric I used for the backing and a few of the squares on the front.  I'll be doing a tutorial on this quick mini quilt a bit later, so for now I'll just show you a pic of the front.  This 22" quiltie is now hanging on a lavendar wall in Colorado. 


And finally, one last look at the mini charm quilt which measured around 19" square and has 140 pieces in the top, 132 of which were in the center block!


Enjoy your quilts Cindy and Aurora!
Charming Mini Quilt SentSocialTwist Tell-a-Friend

Tuesday, July 6, 2010

Wizard of Oz Quilt

For the movie themed S.T.U.D. quilt swap, I was partnered with Quiltinkimmie (Kimmie).  We each picked a favorite movie and then the other created a mini quilt inspired somehow by their choice.  Well, you already saw the adorable mini based on Alice in Wonderland that Kimmie made me, so here is the one I made her.  Kimmie's all time favorite movie is Wizard of Oz--lots of inspiration off of that one! 

I created my own design and threw in lots of hints at the story of the Wizard of Oz. 


The center is hand embroidered with the basket base appliqued.  I used two vintage patterns combined plus some drawing of my own to get the design.  Of course, being the person of a four-legged myself, I had to feature the lovable hero of the movie--Toto! 


The borders were a brick layout using three different yellow tone-on-tone fabrics (Yellow Brick Road, duh)and the corners were created using one portion of the heirloom block named Kansas Star.  For a little Oz fun, I used two different poppy fabrics to create each corner.  The binding is in a dark green, hinting at the Emerald City.


For the back of the quilt, I found some of the official Wizard of Oz fabric with the blue gingham of Dorothy's dress.  I also opted to make a label that looked like a postcard.


Of course, when you're in the world of Oz, you have to do a little shopping for treats.  Here's what I sent along with the quilt for fun. 


That's a lollipop from the Lollipop Kids, a package of poppy seeds so Kimmie can start her own poppy field, a copy of a vintage Wizard of Oz quilt with embroidery patterns, a tin of Good 'N Bad witch treats (pink and green jelly bellies for choosing which witch you'll be), pink strawberry marshmallows with a copy of Glinda's Magical Puffed Rice Treats recipe (rice krispie treats) and some official Emerald City Dust.  I made up the last three myself which was a lot of fun.  (Yes, I regularly make souveniers to places that only exist in the imagination--you should have seen the Vulcan gift shop tag and toy I made for my sister to give to a friend that's a Star Trek fan!)

The only problem of the whole thing--I had way more ideas than I could make or send for this one swap!  Guess I'll have to hope for another Oz fan in a swap where the theme is open.

Enjoy your package QuiltinKimmie!
Wizard of Oz QuiltSocialTwist Tell-a-Friend

Saturday, July 3, 2010

Fabric Folded Pinwheel Quilt

Finally, the postal service has delivered my swap quilts to their new homes, so I can show them to you.  The first one was for the Swap Til You Drop group (also know as S.T.U.D.) in the Anything Goes category--we got to pick what we wanted to send. 

My partner was Caryquilter (Suzanne).  She lives in North Carolina where she helps care for her ill mother, sews quilts for wounded soldiers, participates in making quilts for Project Linus (quilts for kids in hospitals), has a family including a puppy and still somehow has time to make swap quilts and blocks.  She is amazing--I feel like a total slacker.  :) 

For someone so fabulous, I wanted something to cheer and brighten her days (because when you work that hard, you'rsome down dayse going to have ) the way she cheers and brightens so many other lives.  I designed the mini quilt in bold vivid summer colors with a pinwheel pattern (there's just something happy about pinwheels).  For added interest, I created some 3-D pinwheels with fabric folding.  I used this tutorial, but cut the measurements in half.  And, for that little extra color pop, I added round yellow vintage buttons to the centers of the 3-D pinwheels and a matching yellow binding.  I quilted around each 3-D pinwheel (somewhat tricky) and wave lines through the rest (trying to give the feel of wind). Here it is, in all its 12 inch glory:


For the back I used a white with orange flower fabric.  The flowers kind of reflected the pinwheel shape and looked like they were blowing through the air.


Here's a closer look at the 1/4" binding--very tiny to work with, but the scale fits the miniature quilt size better than half inch.  (Still working on getting those corners perfect.)


A better view of the 3-D pinwheels.  They really are quite easy to make, just watch your fingers when ironing something this small!


Of course, you don't just send a miniature quilt by itself in a swap (well, you could, but where's the fun in that?) and so here's a look at the goodies I sent along to Suzanne.


Two fat quarters of quilt shop fabric from my stash.  Stars's favorite treats for her new puppy to enjoy.  A postcard from Oregon so she can see the mountain I see everyday from my town.  A cooling neckwrap that I made for her--North Carolina gets hot and humid!


The hankerchief doll is one I made as a reproduction of a vintage one I saw in a book.  A little notepad for jotting all those great quilting inspirations in.  Little citrus candies because, sadly, it's already too hot in North Carolina for mailing chocolates.  (Truly tragic in my mind.)  Pretty floral binding clips, quilters use them to hold bindings in place while handstitching them to the back of a quilt and on minis they also can help hold the layers in place while basting the quilt sandwich together.  And, finally, a little magnetic needle book with 3 John James #10 Betweens needles (love these, they are so nice to sew with).


It was a lot of fun to try fabric folding and paper piecing the regular pinwheels helped to ensure accurate points on these small blocks.  I hope this mini quilt brings her happiness everytime she looks at it!
Fabric Folded Pinwheel QuiltSocialTwist Tell-a-Friend

Monday, March 8, 2010

February: One Doll/Softie A Month Challenge

Well, I had grand plans of photographing my jewelry to list on Etsy today.  The weather was great--bright and sunny--a beautiful day.  Oh, except for the biting cold wind blowing through the area.  By the time I finished cleaning and setting up the spot I wanted to use I was freezing!  Now, before you think I spent hours on this, we're talking ten minutes, 15 tops.  Even Stars didn't protest too much about coming in early, and he's the king of stalling when it comes to going inside on a sunny day.  Yes, its true, I totally wimped out in the cold.

So, no photos of jewelry, but I finished up the Edith Ackley Flack baby for the doll house family--she's more like a little toddler.  She is February's challenge doll, but it took me a bit to find the "rouge" stick I use for creating rosy cheeks on my dolls.  Isn't she a cutie pie? 


And at only 4.5 inches tall, she is adorable--although quite tricky to turn and stuff.


She is completely handsewn with handpainted undies, socks and shoes.


She as a salmon pink floral cotton dress and a coordinating baby ribbon bow in her beautiful auburn hair.


Now how can you resist such a doll?  (On after thought, she kind of looks like my little cousin Paige!)  And finally my sister can stop calling her creepy because "she's faceless"--I think she heard you!
February: One Doll/Softie A Month ChallengeSocialTwist Tell-a-Friend
Related Posts Plugin for WordPress, Blogger...