Sunday, September 26, 2010

Halloween Fabric Postcards

I was invited to join a fabric postcard swap awhile back--and, having never heard of making fabric postcards, I just had to check it out--and then, of course, I just had to sign up for a round of the swap!  (It's like that book If You Give a Mouse a Cookie.)  I was intrigued over the idea and with the theme of Fall or Halloween, I thought it'd be a perfect chance to use some of those cute Halloween ideas I've seen, but never really gotten around to.  I know back East, Halloween is a pretty big deal, but around here, not so much--guess we're just not that into trick-or-treating in the rain!  LOL

The swap was three postcards, each one to a different partner.  All three of my partners said either Fall or Halloween as a preference, so I went with Halloween for all three.  I had a lot of fun trying out some ideas on these.  Each one has a different front, but the backs are all simple muslin with a quick message to my partner and their address (which is why I won't be showing the backs).  I would have loved to use some of my Halloween fabric on the back, but we were supposed to write on them, so prints were out.


All three have a border of varigated quilting thread and an interior of a very stiff heavy Pellon interfacing--no one wants a floppy postcard.  I used adhesive photo spray instead of an iron-on as that was what I had on hand.  It actually worked quite nicely and I definitely would use it again.  I knew I'd be mailing them in an envelope rather than straight through the mail (wanted to keep them clean), so I had some fun with a couple of simple embellishments.

The first one I made was the pumpkin face.  I found a goofy pumpkin in one of my mom's tole painting books by Gaye Shoell that was just to funny to pass up.  His eyes, nose and tooth are appliqued. I sewed shell beads for the center of each eye.  The rest of his face is hand embroidered.  I did add a bit of blush to his cheeks with a colored pencil and a few black lines with a pen.  Makes you smile, doesn't he?


The second postcard I created was the ghost.  I used a patterned fabric for the background and appliqued the ghost body (another Gaye Shoell design) down with a bit of batting underneath so he's a little puffy.  His eyes are French knots and the cheeks are colored with colored pencil and a few small embroidery stitches.  The star and square are raw edge appliqued--the black square says "Boo!".  I also sewed an pale orange mother-of-pearl button on for added dimension.  He's a sweet little ghost.


For the last postcard, the little witch, I wanted to do something a little more detailed.  She is from a vintage embroidery pattern.  I raw-edge appliqued her hat and dress with a fun fabric that had holographic stars on it.  The main coloring is with coloring pencil (ironed) and a black pen.  Her broom straw, eyes and hat band are hand embroidered.  I gave her red hair like me (okay, mine is not literally red like that).  Who could be afraid of a cute little witch like this?


So, there you have it--probably, the only Halloween crafts I'll get to this year.  I definitely had fun making these postcards.  They are quick to make and I'm sure I'll make more in the future!
Halloween Fabric PostcardsSocialTwist Tell-a-Friend

Friday, September 24, 2010

Monkeys, Elephants, and Babies--oh my!

So how do you decide what to give for a baby shower gift?  Well, for me, I have a division of two main categories--bought and handmade.  There are a lot of baby shower invites constantly coming through, but some people get lazy and cheap about it and just send out a mass email or mention it to you in the grocery store.  Really?  A new baby and that's it, a two line email sent to everyone in your address book?  Hmm, I always think babies are more special than that.  So for the lazy, I give lazy--I go buy something.  Oh, don't worry, its something nice--never jip a new baby.  But for those who actually bother to mail out an invitation to me, I make something.  Quilts, toys, booties, who knows, but I make it.  Sure it takes more time (and money), but obviously these moms are really into having a baby--so I put the effort in.  I usually like to make a snugly blanket with flannel and minky.  Mmm...

This time, for a baby boy, I decided to do something different--toys!  I've been hearing all about how wonderful those crinkle toys are, so I just had to make some.  I made two.  First, a softie toy monkey.  I used the Millie the Monkey pattern from Bit of Whimsy Dolls but added some crinkle to its body.  I figure this toy will grow with the baby until he's much older.


Bright and cheery isn't he?  (He's been renamed Charlie because I didn't think he looked like a Millie, BTW.)  I used luscious flannels for this monkey so he's soft and cuddly.  His face is hand embroidered (no buttons for babies!) and inside this monkey's tummy is some extra crinkle material (McDonald's coffee packet wrappers in this case) so that when Charlie is squeezed he sounds fun and crackling.


I used orange minky-type fabric for the backs of his ears for a little fun texture.  I also embroidered a little heart on his bum!
I also made a flat crinkle toy; something that could be taken with the baby easily.  To go with the monkey softie, I had some great jungle flannel and some fun orange plaid flannel.  (I know, how perfect is that--and I didn't even preplan it!)  I decided an elephant would be best, so after searching for a great shape for an elephant, I came across this adorable quiltie pal made by Kim Burley (quiltinkimmie).  She, being a completely awesome person, let me use the shape for my elephant. 

I lined the inside with cleaned wrappers from protein bars (my border collie loves the sound, so it must be good) and a cough drop bag.  (I've also heard of moms using the wrappers from diaper wipes, but not being a mom, I didn't have a spare one on hand.)  I also used a grosgrain orange polka dot ribbon for the tail which will also act as a loop for the plastic accessory ring so mom can attach it to the baby car seat or a pacifier or whatever.


You can see where I stitched the shape of an ear and top stitched around the edge of the elephant--this not only adds to the finished look, but also helps hold the inside wrappers in place.  (His name is Peanuts.)


Now all these cool toys need is a baby to scrunch them--but that's someone else's part!  :)  Enjoy your new home Charlie and Peanuts!


Monkeys, Elephants, and Babies--oh my!SocialTwist Tell-a-Friend

Tuesday, September 21, 2010

Landscape Received

Before I get all distracted with showing you some stuff I made for a baby shower gift, I absolutely must show off the landscape quilt I received in the last swap round for S.T.U.D. (Swap Til You Drop).  My partner was quiltedoma (Andrea) and she made me this little lovely:


Pretty gorgeous, I know.  She used an assortment of lovely batiks which not only gives some landscape-ish design but also a watercolor sort of feel to the whole quilt.  Oh, and she hand appliqued it all down too!  There's also some small beads sewn on for embellishments and a touch of hand embroidery for added texture.  Plus (as if that wasn't enough work), she hand quilted this with teeny tiny stitches!  Here's a closer look at some of that hand work and embellishment.


Makes you want to run out and buy batiks, doesn't it?  The little beads add just a glint here and there when the light hits it just so.  The quilt is so much lovelier in person than what the photos can show.  The scene kind of reminds me of parts of Eastern Oregon that I traveled through on my way back and forth to college so many years ago (we won't discuss the number).

Andrea also sent along a bunch of goodies for me to enjoy.  (I know, I'm totally spoiled!)  Included in the box was some black and white fabrics (she's in my Bee White Black group, so she knows how I love bw), some fun rainbow rickrack for embellishing, lovely blue floral magnetic bookmarks with Oriental designs (love blue, love flowers, love Asian design--bingo), embroidery floss (she found out I like to hand embroider), and some European chocolate (enough said).  Even the tissue paper wrapping it all looked pretty cool--and inspired a quilt design!


Okay, so the chocolate didn't last long (although, in all fairness, I did share...some), but I will be enjoying the other goodies, and most especially, the lovely miniature quilt for quite a long time to come!  Thanks Quiltedoma, I love it all!
Landscape ReceivedSocialTwist Tell-a-Friend

Saturday, September 18, 2010

Sunset Quilt

I just realized that I never posted about my sunset quilt!  Oops! 

I chose to do the landscape theme in the last swap for S.T.U.D. (Swap Til You Drop).  This was my first landscape quilt--and the only applique I'd done was the basket on the Wizard of Oz Toto quilt.  I did practice a little machine applique first making four pink bunny blocks, just to build up my comfort level first.  At the suggestion of some of the Flickr members, I quilted at the same time as I did the machine applique so that the shapes showed on the back like a drawing.  I'm still not 100% sure I like that look, but it is an interesting effect and I'm glad I tried it.

Here's a look at the back:


I used decorative stitching for the machine applique for a little added texture to the piece (and way more fun then just plain zigzag stitching).   For the label, I made a little house shape and instead of putting the label in a corner, I put the "house" into the scene.  The purple border is the actual binding.  I know, you're wondering what the binding is doing on the back--its called a knife-edge binding.  This is a sneaky way of putting a binding on without it showing on the front at all--think of a gallery wrap canvas print.  Perfect for art quilts.

Here's the goodies I sent with the quilt:


My partner, Andrea (quiltedoma), is a cat person (no one's perfect), so I included a cat pattern called Nana's Pretties and a piece of cat Laurel Burch fabric.  I literally had one little piece of cat fabric in my entire stash--maybe I should have sent some dog fabric instead for a little chaos in her sewing room, lol!  I also sent some fabric with dots for her dot fabric drawer.  (This woman has a fabric stash that makes me drool--think small fabric store!)  I also included some goofy lighthouse/seashore fabric, because, afterall, it is a landscape theme.  There's also a bag of tiny beads for use in quilt embellishments, some vintage rose piping, a cooling neck wrap (New York was having really hot weather at the time) and one of my reproduction hankie dolls.  There's also a bag of herbal tea which is my own blend of lavendar mint.  I also included a print out of the paper pieced pattern for a block I made in the Bee White Black group that Andrea loved so much--now she can make one too!

Alright, enough stalling!  The front of my sunset quilt:


I wanted something vibrant and just a little artsy.  I think I accomplished it.  I did not have a pattern, just an idea in my head and I cut it out as I went.  The quilt is pretty close to what I was envisioning, so I'm quite happy with the results.  I love that there is no binding showing so it is more like an art canvas.  This is made entirely with fabrics from my stash and scrap bin, so I also followed my "no buying" rule (self-imposed until I finish all signed up swaps through November).  It was fun to try something new--and everyone here who saw this little quilt fell in love, so I may have to make another one sometime!
Sunset QuiltSocialTwist Tell-a-Friend

Bee Blocks

Just a couple of quick and easy bee blocks for September to share.

First, for Bee White Black, Crystal (LemondropDezigns) asked for asterick blocks with her fabrics.  She sent enough for two just in case we messed up on something, but I didn't, and they were easy (I think I finished both in just a couple of hours--and that was with interruptions from Stars), so I went ahead and made up two for her--because who couldn't use an extra block, right!


Simple, yet effective.  Want to make this block yourself?  Here's a great tutorial from the Selvage Blog on how to make an asterick block.  The only thing I did differently was to make this block 10.5 inches as requested.


The next set of blocks were created for Sara (chickentracksetc) in the Scrap Happy Bee.  Sara requested cheerful fabrics in a four patch pattern made with 5 inch blocks.  (This is a great beginner block, btw.)  Super simple to make, these buggers whip up in no time.  Later, Sara will be sewing all her blocks together with a solid color sashing.


There is an easy way to get that center corner to match up.  Sew your squares into sets of two.  Press the seams to one side and make sure that when your blocks are open and laying flat, one set has the seam pressed left and the other set is pressed right.  Then when you lay the sets together to sew the center seam, they'll butt up together at the seam fold thus creating that perfect line up!  Try it, it really works!

And, of course, I had to use some yellow--it is the cheery color!


Ever wonder how to pick fabrics that work well together?  Well, you could go buy an entire fabric line.  But, what if you're working on a scrappy quilt like Sara is?  Here's my tip:  pick a print that you like with a few colors in it, then pick other fabrics that have the same colors.  From there you can pick out other prints that coordinate much easier by just continuing to match colors.  The first block has that cheerful donut circle pattern--the other fabrics each feature a color that was somewhere on the print (might have even been a color from some of the shading).  You could also find prints with white, yellow, turquoise, or that reddish pink from the stripes on the pink block or even some different greens from the dashed lines on the green block.  The second block, I picked that fab yellow with purple tulips fabric and coordinated another slightly different yellow, the green from the stems and a purple from the flowers.  I could have also pulled in some white or a pinkish violet to match with the other parts on the flowers.  I could also pick a different shade of any of those colors and prints with those colors.  Then, use a neutral color for the solid such as white or gray to tie it all together without competing with the prints. The possibilities are really endless with fabrics, so go ahead and try your own scrappy quilt!
Bee BlocksSocialTwist Tell-a-Friend

Friday, September 10, 2010

Doll Quilt Swap 9--Finished! (Big Sigh)

After all the planning, the fusing, the cutting, the placing, the applique, the fussing and stressing---it's finished!  The lovely quilt I created for my secret partner for the Doll Quilt Swap 9 has been carefully packaged in its Priority Mail tube and shipped off to its new home (wipes tear from eye) along with some extra goodness.  What did I include in the package?  Well, hopefully it's all stuff my partner will like (otherwise I'll feel bad that I spent the extra on postage instead of eating the vanilla Goldfish crackers like I was tempted to do).  I included some metal embellishments (one says "cherish" and the other "love"), a pin cushion, pin toppers, a mug rug and before mentioned vanilla Goldfish crackers, which, btw, if you haven't tried you absolutely must.  Really, I mean it.  Go, right now and get some--then come back and finish view the world's most awesome quiltie.  (Don't worry, I'll wait.)


Well you don't really need a closer look at the Goldfish crackers, just try some (and get the chocolate ones too while you're at it).  But here's the little pincushion I made.  One point didn't line up right, argh!  Otherwise, a perfectly cute little 4 inch pincushion made with some Hoffman Meadow Dance fabric (my partner loves green) and some Kona Coal, another partner fav.  I found the most perfect matching button in my vintage button collection--doesn't it look like Kona Ash and Coal!  And while I am often loathe to part with my buttons (it's an obsession really), it was just too perfectly coordinated with the pincushion and quilt to not use it.


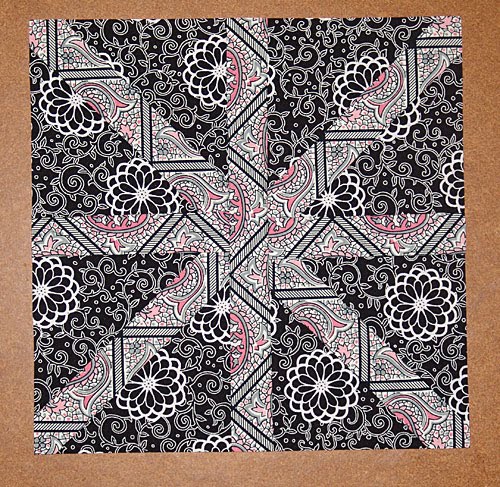
Here's the pretty back--some of the Westminster Fibers fabric that I used on the quilt back.  (Won from Bearpaw in a blog giveaway!  That fabric has been from New York to the UK to Oregon and now back to the East coast.  The fabric is more traveled than I am!)  Another vintage button--the photo really doesn't show the color right it's actually closer to the fabric pink in color.  I'll tell you, sewing those buttons on so that the center indented was a big pain in the neck, but the results are worth it.


My partner, without knowing that she was my partner, mentioned that she was so busy that she'd regrettably had to turn down being in the 
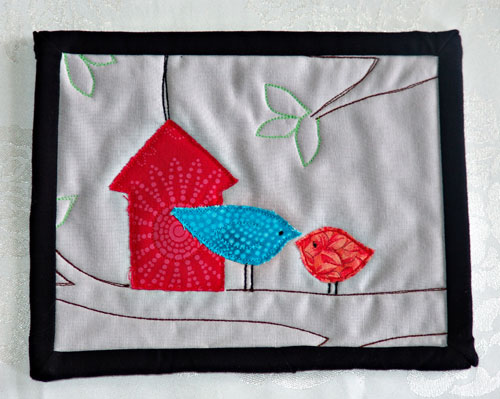
Scrappy Mug Rug Swap.  (Horrors!)  We can't have a sad little mug with no rug (hmm, that sounds a bit Dr. Seuss-ish).  So, of course, being the completely sneaky partner I am--I made her one.  And, of course, I matched it to her quilt.  I did use different fabrics for the birds just so it wasn't totally the same.  I did a little free-motion drawing with the thread to make branches and leaves (some got cut off when the binding was added, but I like the effect.


Here's the back.  You can see how the applique stitching and thread drawing create the picture on the back. 


I needed to come up with something else that was fun to add to the goodie pile and then I saw pin toppers.  Adorable customized sewing pins with cute things at the top--like the old hat pin toppers, only much, much smaller.  I traded one of my sisters some seamstress work for her to create me some to give to my partner.  Sure, I could  make these, but why--she's already a genius talent with fimo clay (she makes miniature dragons and such), so why not let the expert do it.  Of course, she could not find her little tools, packed away somewhere, but being the artist that she is she adapted with a straight edge razor and a bamboo skewer.  (What can I say, the girl's got skills.)  My sis took a look at the quilt and then made these three pin toppers--how cool is that?!  These are made using glass head sewing pins that are only 1.5 inches long--we're talkin' uber tiny toppers!  Note the pearlescent nature of the toppers, so fabulous!


And now, what you've all been waiting for...drumroll please...  may I present... Leafy Treetops, my Doll Quilt Swap 9 creation!  (And the crowd goes wild!  Okay, so there's no crowd.  If there was a crowd though, it would be going wild right now.)

Just for a quick recap on fabric:  the background is Kona Ash, tree is Kona Coal and binding is Kona Black.   Sorry, I have no idea what the fabrics for the birds and house are, the selvedge is long gone.  I appliqued the edge and echo quilted the entire thing (took forever, but with these results, I can say it was definitely worth it) using Sulky premium 40 wt. rayon thread in Light Silver (number 1236) for the top and a Mettler thread (color 623) on the back which blended perfectly with the Kona Coal.  The rayon added a little sheen which glints here and there as the light hits it which I love.  This combo also quilted beautifully without any problems.

Where'd I get the name?  From a children's song that I learned as a small child (luckily, you don't have to hear me sing it)  that goes "In the leafy treetops, the birds sing good morning.  They're first to see the sun.  They must tell everyone!  In the leafy treetops, the birds sing good morning."

Some of you have asked if I drew the design.  Sadly, no.  My drawing skills are fairly limited unless you're talking drafting or perspective or a garden landscape plan.  It would take me far to long to draw this tree.  I used three different vector images which I combined and altered to get what I wanted.  You can find these kinds of images by going to websites that sell royalty free stock images (such as istockphotos or fotolia or shutterstock) or you might find some by Google searches.  Just be sure and get permission if its from a private source and follow all copyright laws.


Check out that quilting!  This was not done free-motion despite the appearance.  (I so wish my free-motion quilting was that good.  Nope, I'm at the same skill level as kindergarteners doing division.  So sad.)  I used my applique foot and meticulously (and slowly) went around and around and around.  So, see!  You don't have to have advanced quilting skills to get great results on a project.  Just be willing to put the necessary time in and you can have something wonderful!  Then, keep working on those skills.


My younger sister thought the lines reminded her of those Japanese sand gardens with the rocks--you know that have the lines rippling outward from each rock.  Yeah, now you're feelin' the Zen.  Okay, last quilting shot.


And finally, the back of the back of this quilt.  I love the texture the quilting created on the back.  It reminds me of those antique whole cloth quilts--except those where completely hand stitched which is a completely other level of skill that still amazes me.  Guess I'd be more accomplished if I'd turn off the tv and stay off Flickr...not happening.


I know you've all been wondering who got this little work of insane art.   The big reveal:  Dolores Goodson, also known as DeeRoo G!  Yep, this little quiltie has traveled completely across the country to Lovetsville, Virginia.  I thought the little snails were cute--and fitting as I took so long to make this.  They're from a vintage embroidery pattern that I colored in with colored pencils and then outlined with a Pima pen.


One last look at the quilt before I move on to the next project.  Sigh.  I'm really pleased with how it turned out.  Enjoy your new home Leafy Treetops!


Update (I thought you all would enjoy reading my partner's emailed response too):

I'm feeling faint.....I mean....I have no words! Hold on...some are coming to me....OH MY FREAKING GOSH!!! Shayla...I am tearing up here while I type this....wait...let me get a tissue. Sniff.

Ok...I'm composed. I really,really don't know how to express how much this means to me. This is definitely going into the livingroom WHEREVER I live!! You lady are a truely talented person....Counting the ways....

1. Colors, perfection
2. Stitching, amazing
3. Subject, spot on
4. Continution of the theme...mug rug, mini pins...brilliant
5. Pincushion...in green and grey...my too favorite colors...guess I'm an open book that you read perfectly!!;)
6. I LOVE goldfish!
7. The label, another mini piece of art
8. The back, splendiferous
9. Fabrics, Now that's what I'm talking about!
10. Bragging rights....you got them and I'm going to continue them!!!

Yep....time to get another tissue....now my husband seriously has to get our house finished so I can put this in a place of honor....ALWAYS!

Thank you sooooo much Shayla....I'm even keeping the card!

xoxoxo dolores
ps...I'm going to blog about this and use my 10 ways of loving this package!;)
Doll Quilt Swap 9--Finished! (Big Sigh)SocialTwist Tell-a-Friend

Wednesday, September 8, 2010

Doll Quilt Swap 9

While I was busy with house painting, canning, quilting and all sorts of stuff, I little package arrived in my mailbox all the way from Riverdale, Maryland.  It was my doll quilt (the one I was receiving) from the Doll Quilt Swap 9!

In the package was an adorable, cheerful quilt and some cool vintage fabrics.  I'm sure those will be put to good use sometime soon!  The card she included is adorable with button flowers--how creative!


My partner (not the same one I'm giving too) was KatieJeanBags (Katie).  Here's her little quiltie:


The binding is in Kona Coal with a white background and Coal for the centers.  The rest of the fabrics are from a mix of designers.  I love how she created some dimension by pairing coordinating fabrics of more solid/dark with more open/light.  I do love a good scrap quilt, always have.  It's fun to look at the fabrics and pick out favorites.  My favorite fabric in this quilt is probably the orange snail fabric, it is just so funny and cute!


On the back is a lovely orange polka dot fabric (sorry I don't know which fabric line).  You can sort of see the quilting creates a star pattern.


This quilt is such a joy to have with it's cheerful colors and patterns and it's clean white background!  Katie's life is so busy and full of other people and things that are more important, but she took the time to make this doll quilt specifically for me.  I know I'll treasure it always.
Doll Quilt Swap 9SocialTwist Tell-a-Friend

Saturday, September 4, 2010

DQS9 Update

Just a few pics to quickly update you on my Doll Quilt Swap 9 quilt--and then its back to work for me!

Here it is with all the pieces fused down and ready for stitching:


Then I stiched everything down with a simple straight stitch in matching thread but it just didn't seem to really pop.  So...I  went over everthing again with black thread which gave what I was looking for.  (Kind of like when an artist adds outlining to a drawing.)  Doing this did have the unfortunate effect of causing some of my stitching to be a bit wonky, but on the whole it's good and hopefully my partner will overlook its flaws.


It's a bit wrinkled looking from all the handling as I moved the quilt around for stitching around all those little leaves.  I'm not yet very good at free-motion stitching, so I just used a regular applique foot and worked slowly. 

For the back I used Kona Coal with a wide strip of some Westminster Fibers fabric I won in a blog giveaway (more on that when I get a chance to actually catch up with blogging).  You can see the stitching from the applique as I did sandwich all the layers prior to stitching--this way the stitching acts as quilting and gives a nice little puff to the applique helping it to stand out more.


All in all, I think its turning out well.   That's all for now--more pics when the quilting and binding are done, but right now its work, work, work to get it finished and mailed with goodies by the 8th!
DQS9 UpdateSocialTwist Tell-a-Friend
Related Posts Plugin for WordPress, Blogger...