
This one, sent to me in an email, always makes me laugh. Hope you enjoy it too.
Saturday, January 29, 2011
Thursday, January 13, 2011
Bees for Me
Well, seems my computer hasn't let me edit photos for a bit, I can't show you my latest stuff. However, I can show you what I'm choosing for my months in two bees.
I have the month of January in both the Bee White Black and the Bee Scrappy groups! So, in between sewing bee blocks for others, I've been cutting up fabric and sending out packets to others.
For the Bee White Black group, I had originally planned to do a traditional block pattern, but couldn't get the fabric I wanted for the blocks. Searching on ebay (love that site), I came across some cool looking black and white fabric, but unfortunately, there was only a yard of it. I bought the fabric (well, duh) anyway because it gave me a great idea for quilt blocks.
Here are some scans of the fabric:


I can't wait for my lovely blocks to come pouring in! Try some of these blocks--and let me know, I'd love to see your work!
Off to the post office now--hopefully some packages are waiting!
I have the month of January in both the Bee White Black and the Bee Scrappy groups! So, in between sewing bee blocks for others, I've been cutting up fabric and sending out packets to others.
For the Bee White Black group, I had originally planned to do a traditional block pattern, but couldn't get the fabric I wanted for the blocks. Searching on ebay (love that site), I came across some cool looking black and white fabric, but unfortunately, there was only a yard of it. I bought the fabric (well, duh) anyway because it gave me a great idea for quilt blocks.
Here are some scans of the fabric:


Pretty awesome looking isn't it? So my idea was that each member make a block that looks like one of the squares on the fabric. I sent out a fat quarter each of white and black Kona with instructions to make one of the squares or something similar ending with an outer border of black (any width as long as the finished block ends at 12.5 inches). I plan on sashing them altogether with more black so it will give that slightly off-centered look that all the squares have. Already some of the blocks are done. You can check them out as they appear at the Bee White Black group page. I'm getting pretty excited for this quilt. This will be my first all solid quilt. (I'm blaming Cherri House for this, but then after you check out her City Quilts book you'll start looking at solids too!) The coloring is simple and I think would translate well into many other color choices. Make some up for yourself!
The block I chose for the Bee Scrappy quilting group is a wonky, scrappy block designed by Sarah Vee over at the Sew Joy called Liberated Churn Dash. She's got a great tutorial and very generously gave permission for me to link to it for my group members to use (and for the rest of you too!). I really like her idea of combining wonky and scrappy into an otherwise very classic traditional block. This will be my first wonky quilt, but after making all those wonky houses and stars and such for everyone, I just had to have one for myself. I chose to go with black and white prints and white background for this one (guess I just had black and white on the brain) which I think will give a fun look to the block. Each member is getting an 18 inch white Kona square and few needed some black and white prints too as they didn't have quite enough in their stash. (I know, tragic isn't it!) You can check out the blocks as they are created on the Bee Scrappy group page. I may have to make this block up in a colored version sometime because it is just too cute of a way to use up scraps!
I can't wait for my lovely blocks to come pouring in! Try some of these blocks--and let me know, I'd love to see your work!
Off to the post office now--hopefully some packages are waiting!

Tuesday, January 11, 2011
Squared Away Quilt Tutorial Part 2
Now that you have all your blocks cut apart and center sections swapped, you are ready to begin sewing. You will want to press your seams open as you go, so have your iron and ironing board near your sewing machine to save yourself a lot of back and forth. (Personally, I like to assembly line blocks like this--sew all of one set of pieces, press all, then on to the next set of pieces, etc., it's just easier to keep track of everything that way and I can have music going without worrying about distractions. ) I've included lots of photos, so hopefully no one will get lost--this really is an easy quilt to make!
Here's where we left off:


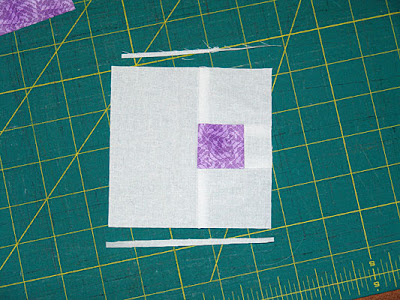

Here's where we left off:

To begin sewing, take the center square and that small piece directly to the right of it and sew using a 1/4 inch seam allowance with right sides together. (By chain stitching the blocks, the sewing will move along faster, just keep track of which ones go where.)

Press each piece by setting the seam first (this is where you simply press the sewn pieces as is--without opening them up) and then pressing open. I like to have my seams pressed towards the darker fabric, especially when working with white, but it really doesn't matter as long as you are consistent!

See how my seams are opposite between each partner block--it will help reduce bulk later and keeps the seams from showing much with the white fabric.

Here's what it will look like with the other pieces:

Next, sew the center square section to the piece directly above it, right sides together. I like to keep the center square section on top so that I can make sure the seam allowance doesn't get turned funny and sewn that way. Be sure and line up the bottom and left edges of the pieces so that you'll have an even inner edge.

Sew with the same 1/4 inch seam allowance. Again, chain stitching will keep things moving right along.

Press as before, with seam allowances towards the darker fabric. You can see how this piece sticks out beyond the center section, don't worry about it, that extra will be trimmed off later.

Now repeat these steps with the piece directly below the center square section. Line the pieces up so that the top and left edges are even--you want the inner edge to be straight and even for attaching to the last piece.

Sew and press open, so that you're pieces look like this:

Here's a quick peek at the backs, so that you can see how I've pressed the seam allowances:

You are now ready to attach the final piece of each block.

Flip the center square section over on to the left side piece, right sides together. Line them up so that the top and right edges are even. (Sorry my photo is sideways, the top of the image is the left.)

Sew and press as with the other pieces. You will now have blocks resembling the letter "F".

Using a ruler and rotary cutter, trim off the parts that stick out from the main block--you're in the process of squaring the block, so try to straighten the edges so that the center square piece looks like it is straight and not tilted.

Square up the rest of your block by trimming away any excess or uneven sides.

Now, square up each of your individual blocks to the same size.

Once all of your blocks are sewn and squared up, you are ready to begin laying out the quilt--that will be in Part 3!
Subscribe to:
Posts (Atom)


